Posted on

Seven for a secret never to be told: Magpie’s Nest Watercolour Painting WIP

A close up of the finished magpie painting

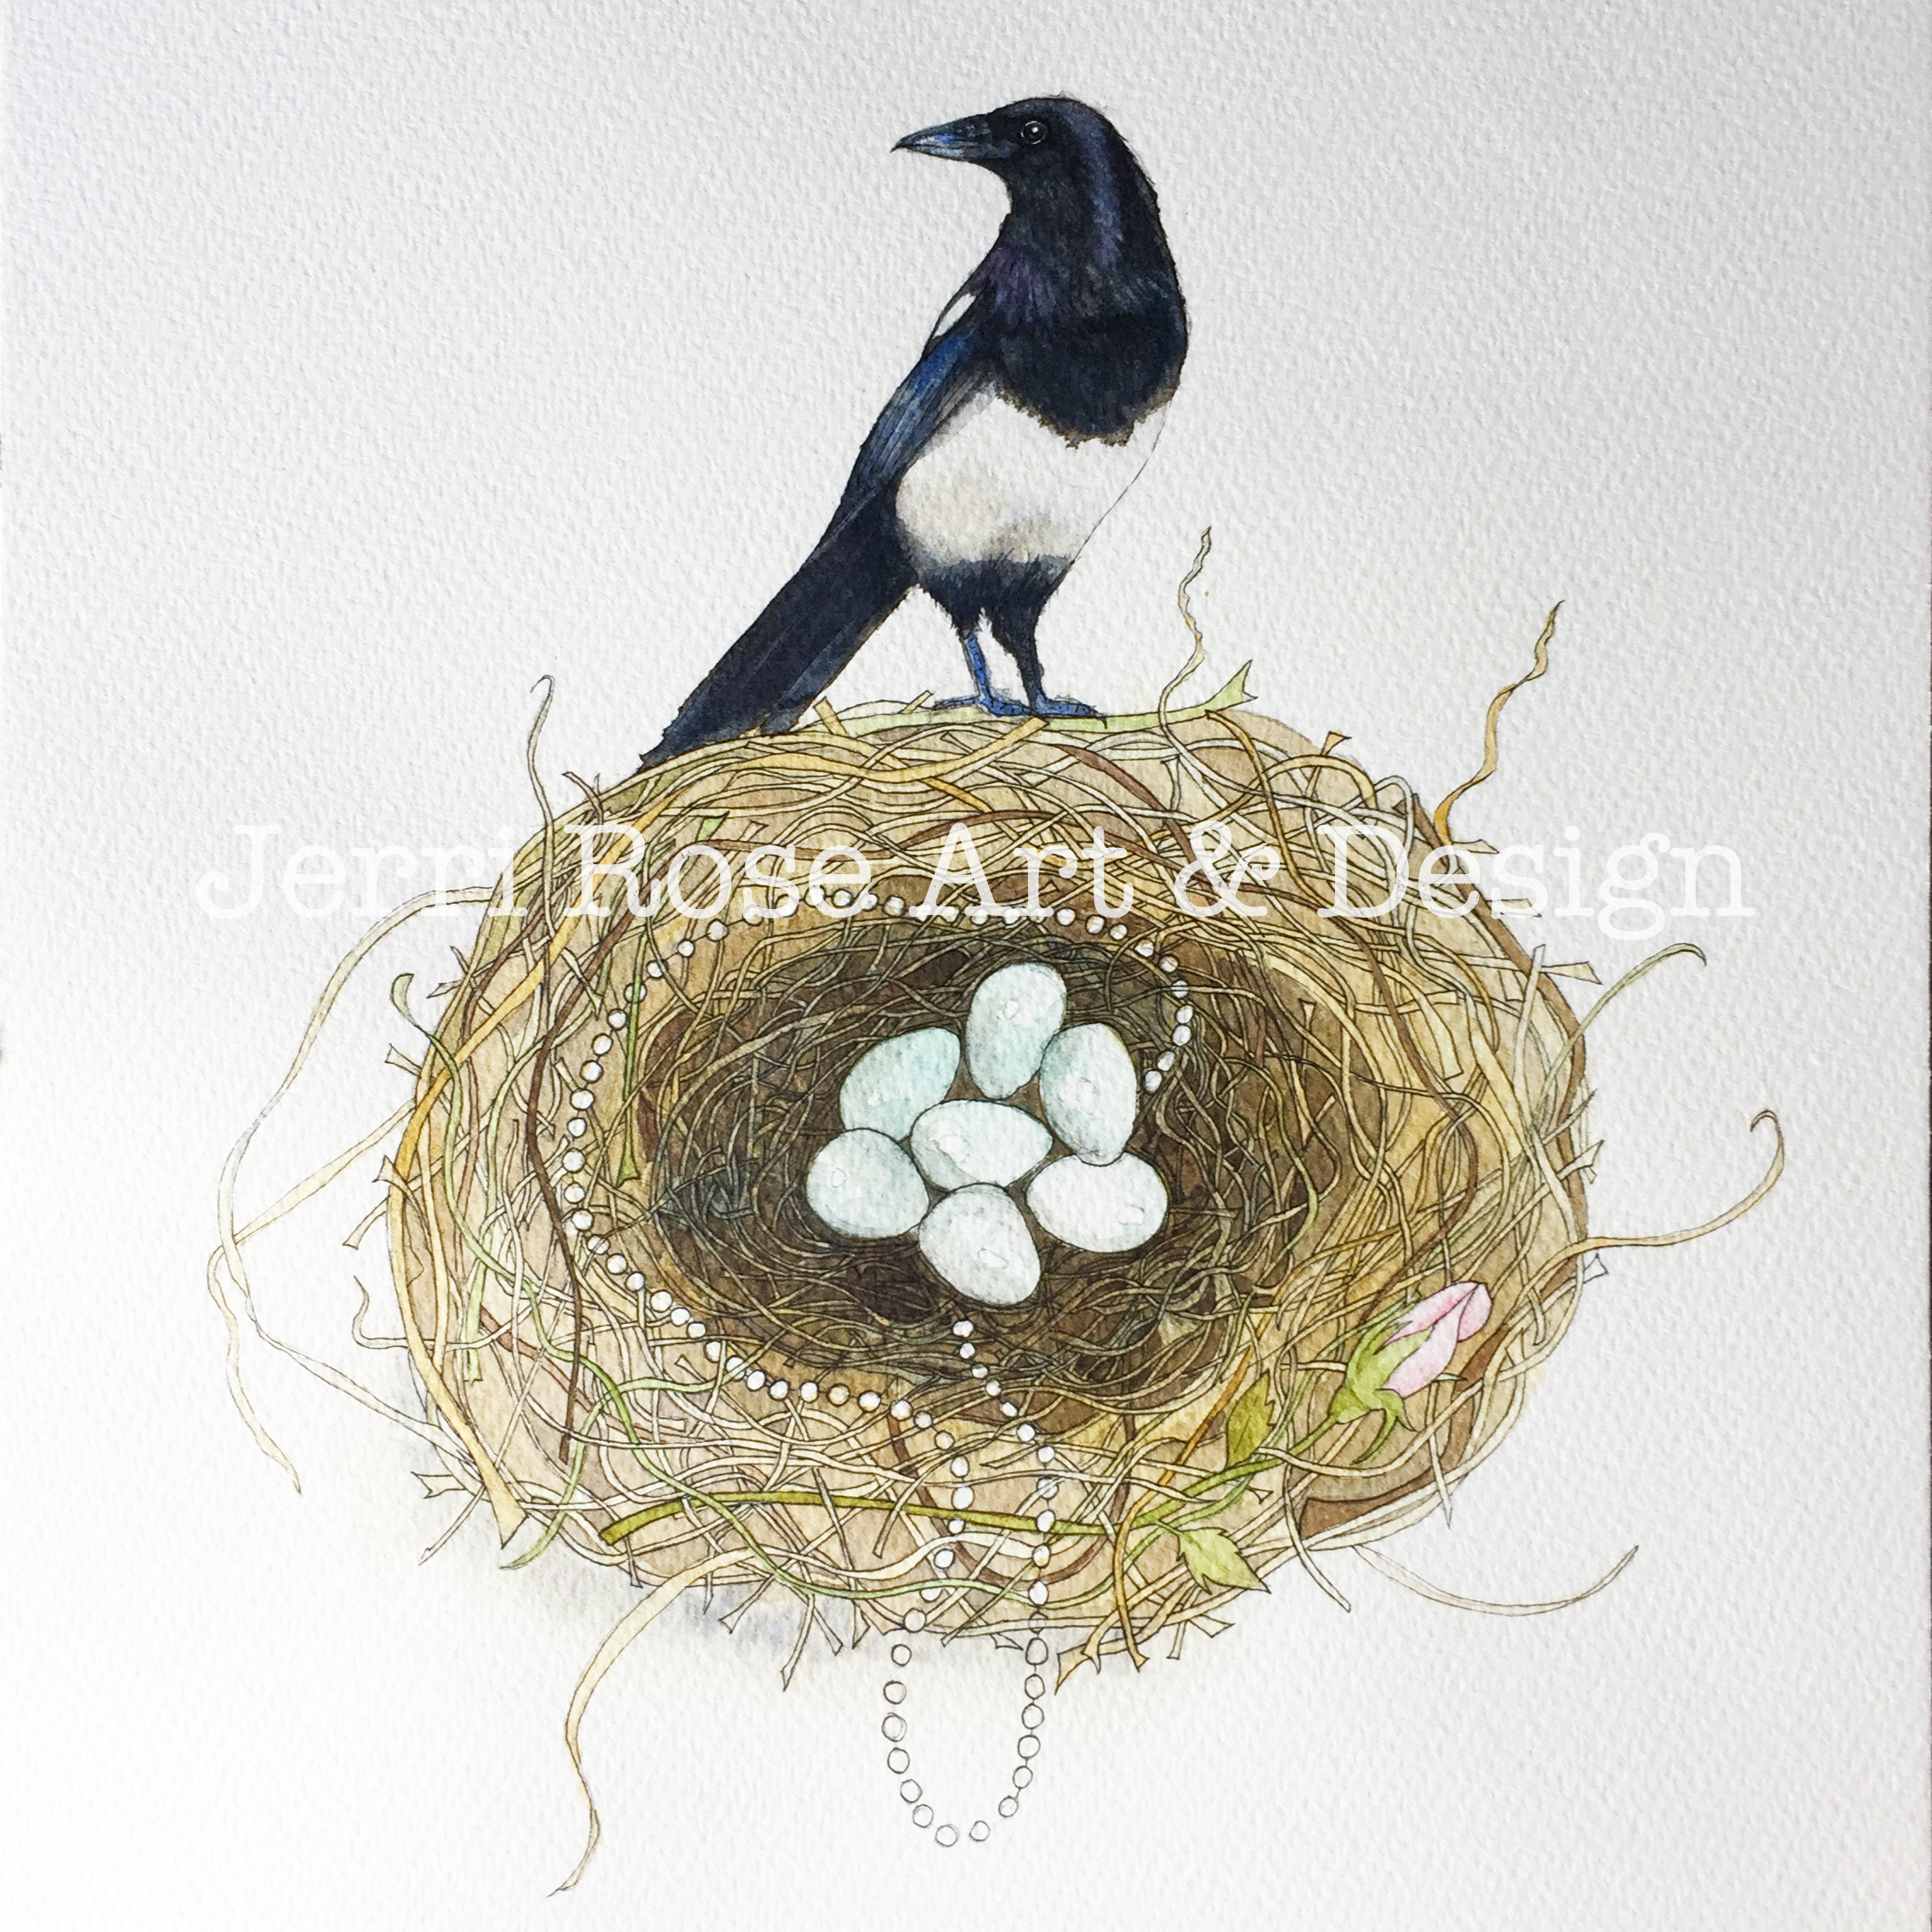
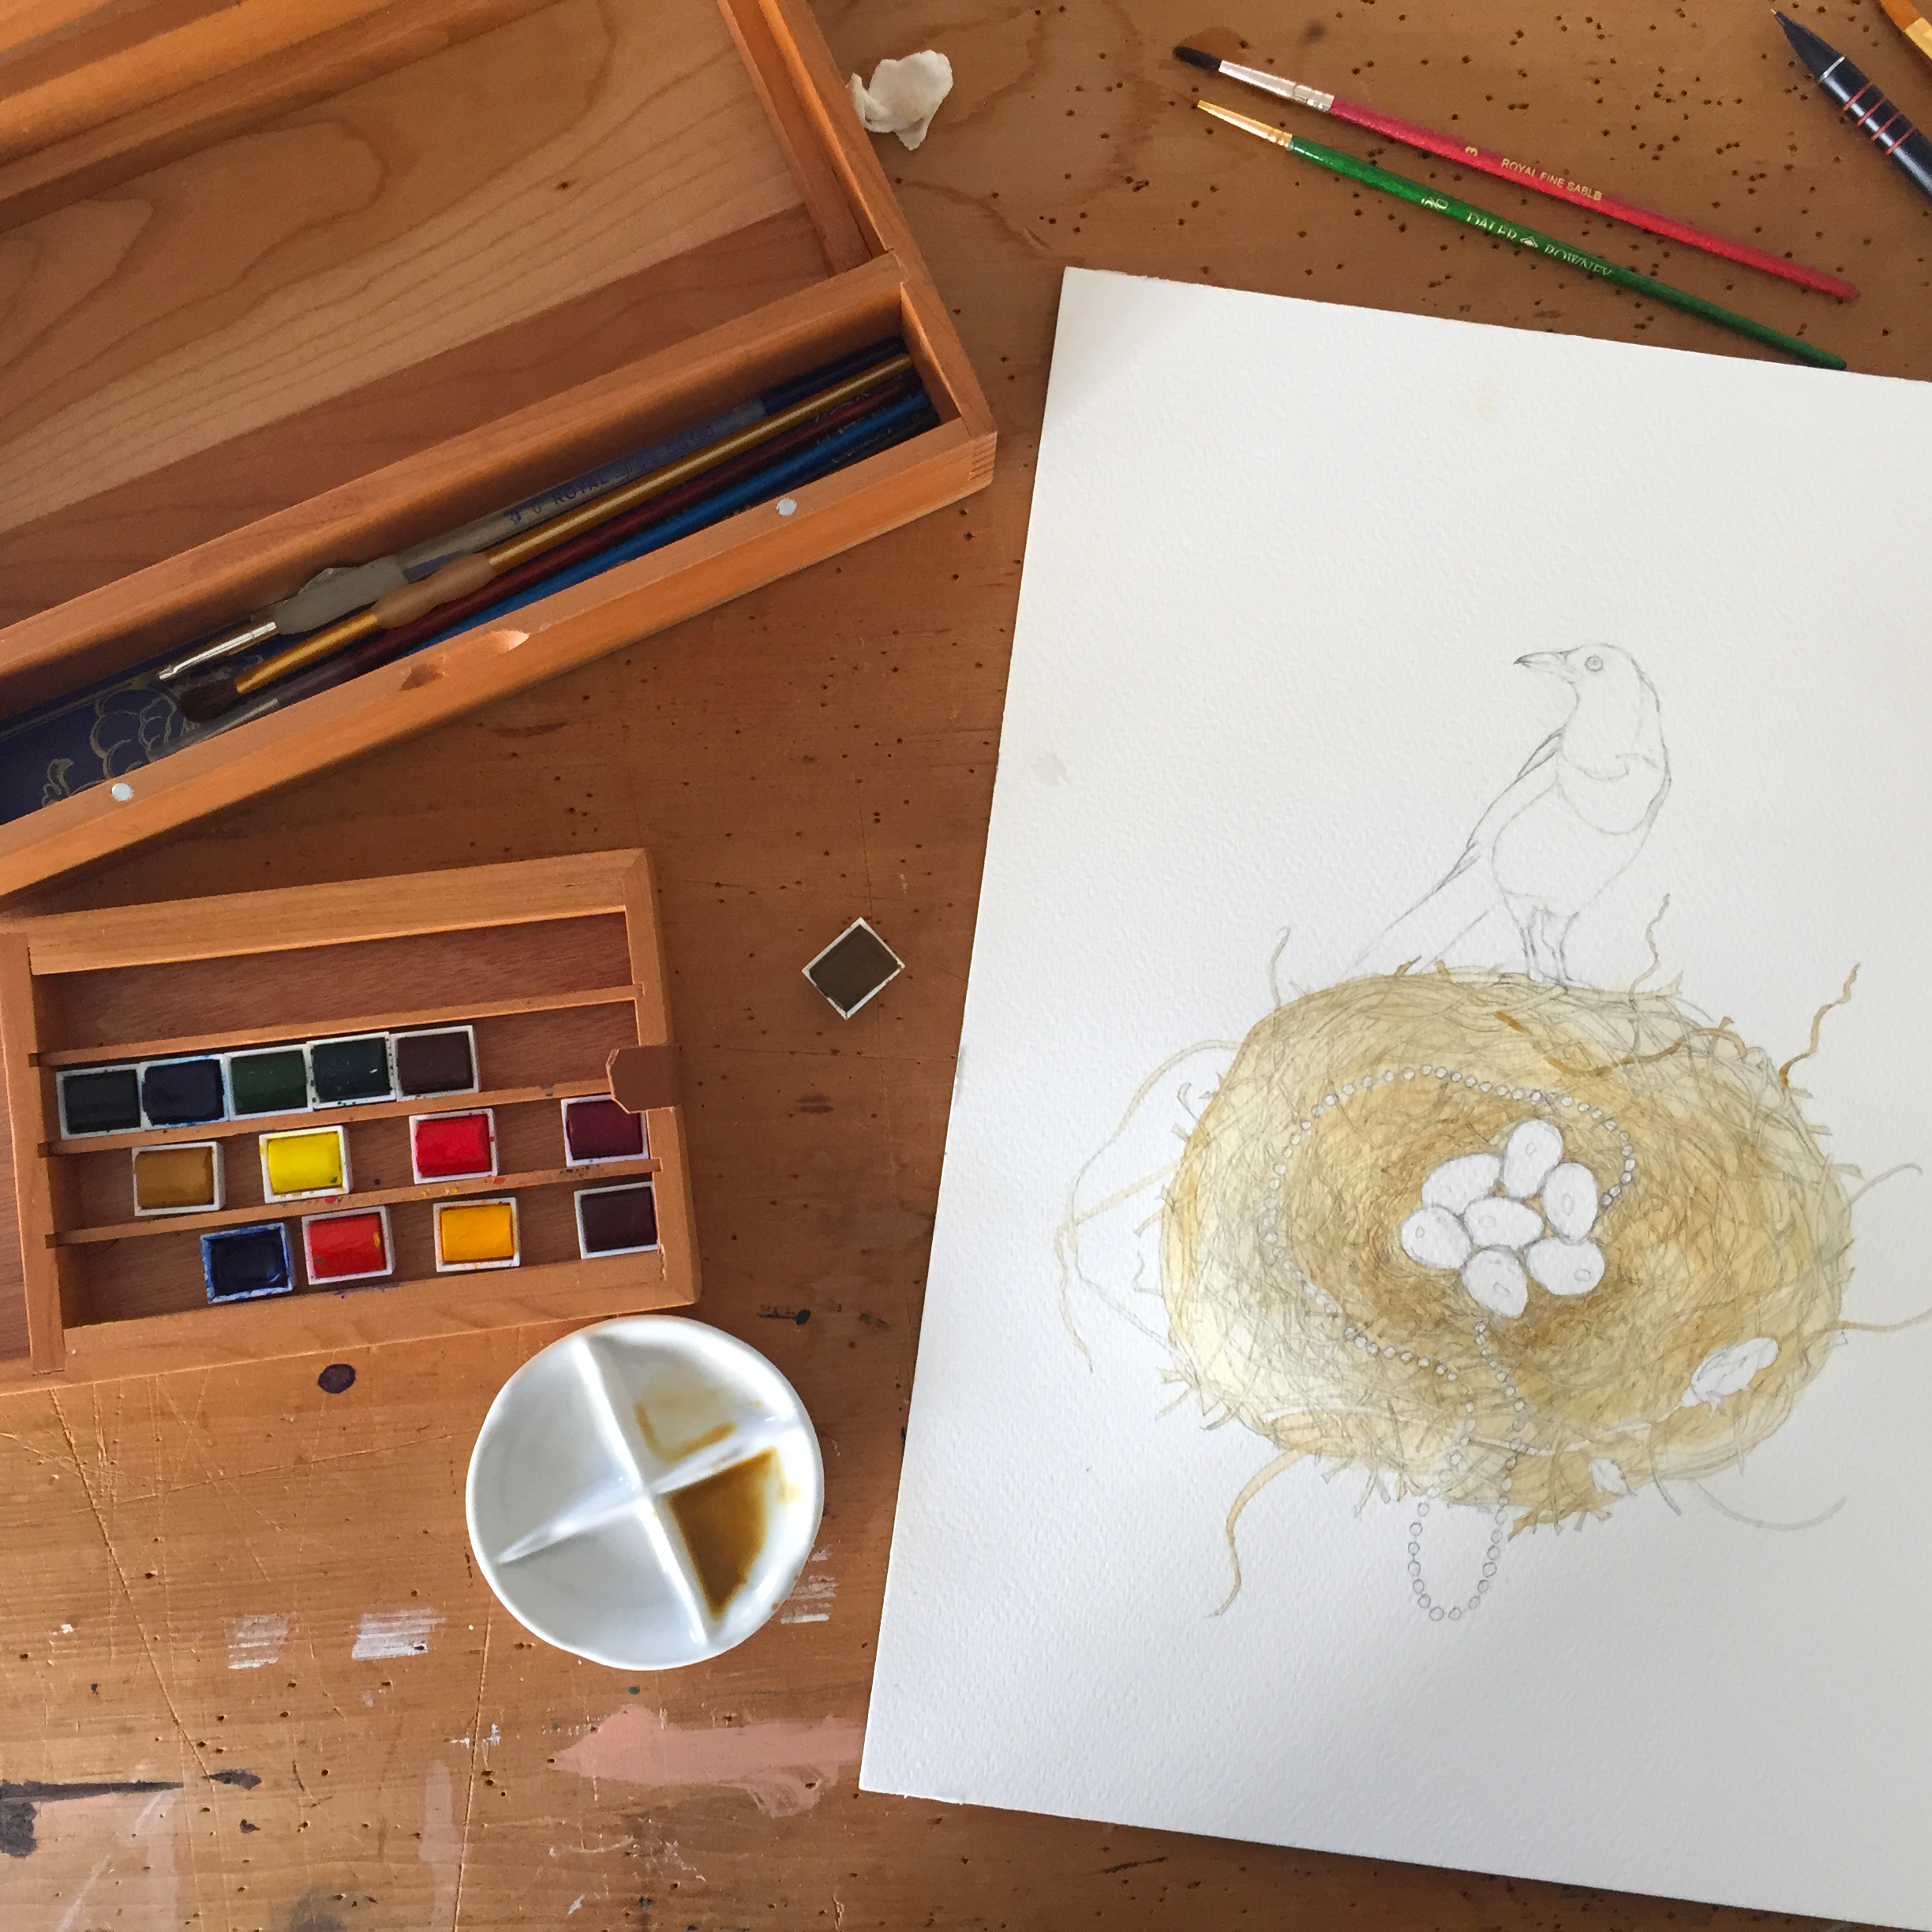
I wanted to start showing the process of making my paintings and drawings via social media to show the thought processes behind the images, but also to encourage me to finish them… This Magpie painting is now finished and below are some of the work in progress (WIP) shots I took along the way.

An image showing the final watercolour painting of a Magpie and it's nest..

I started off with a quick simple sketch of a magpie just using pencils.

A pencil sketch of a magpie

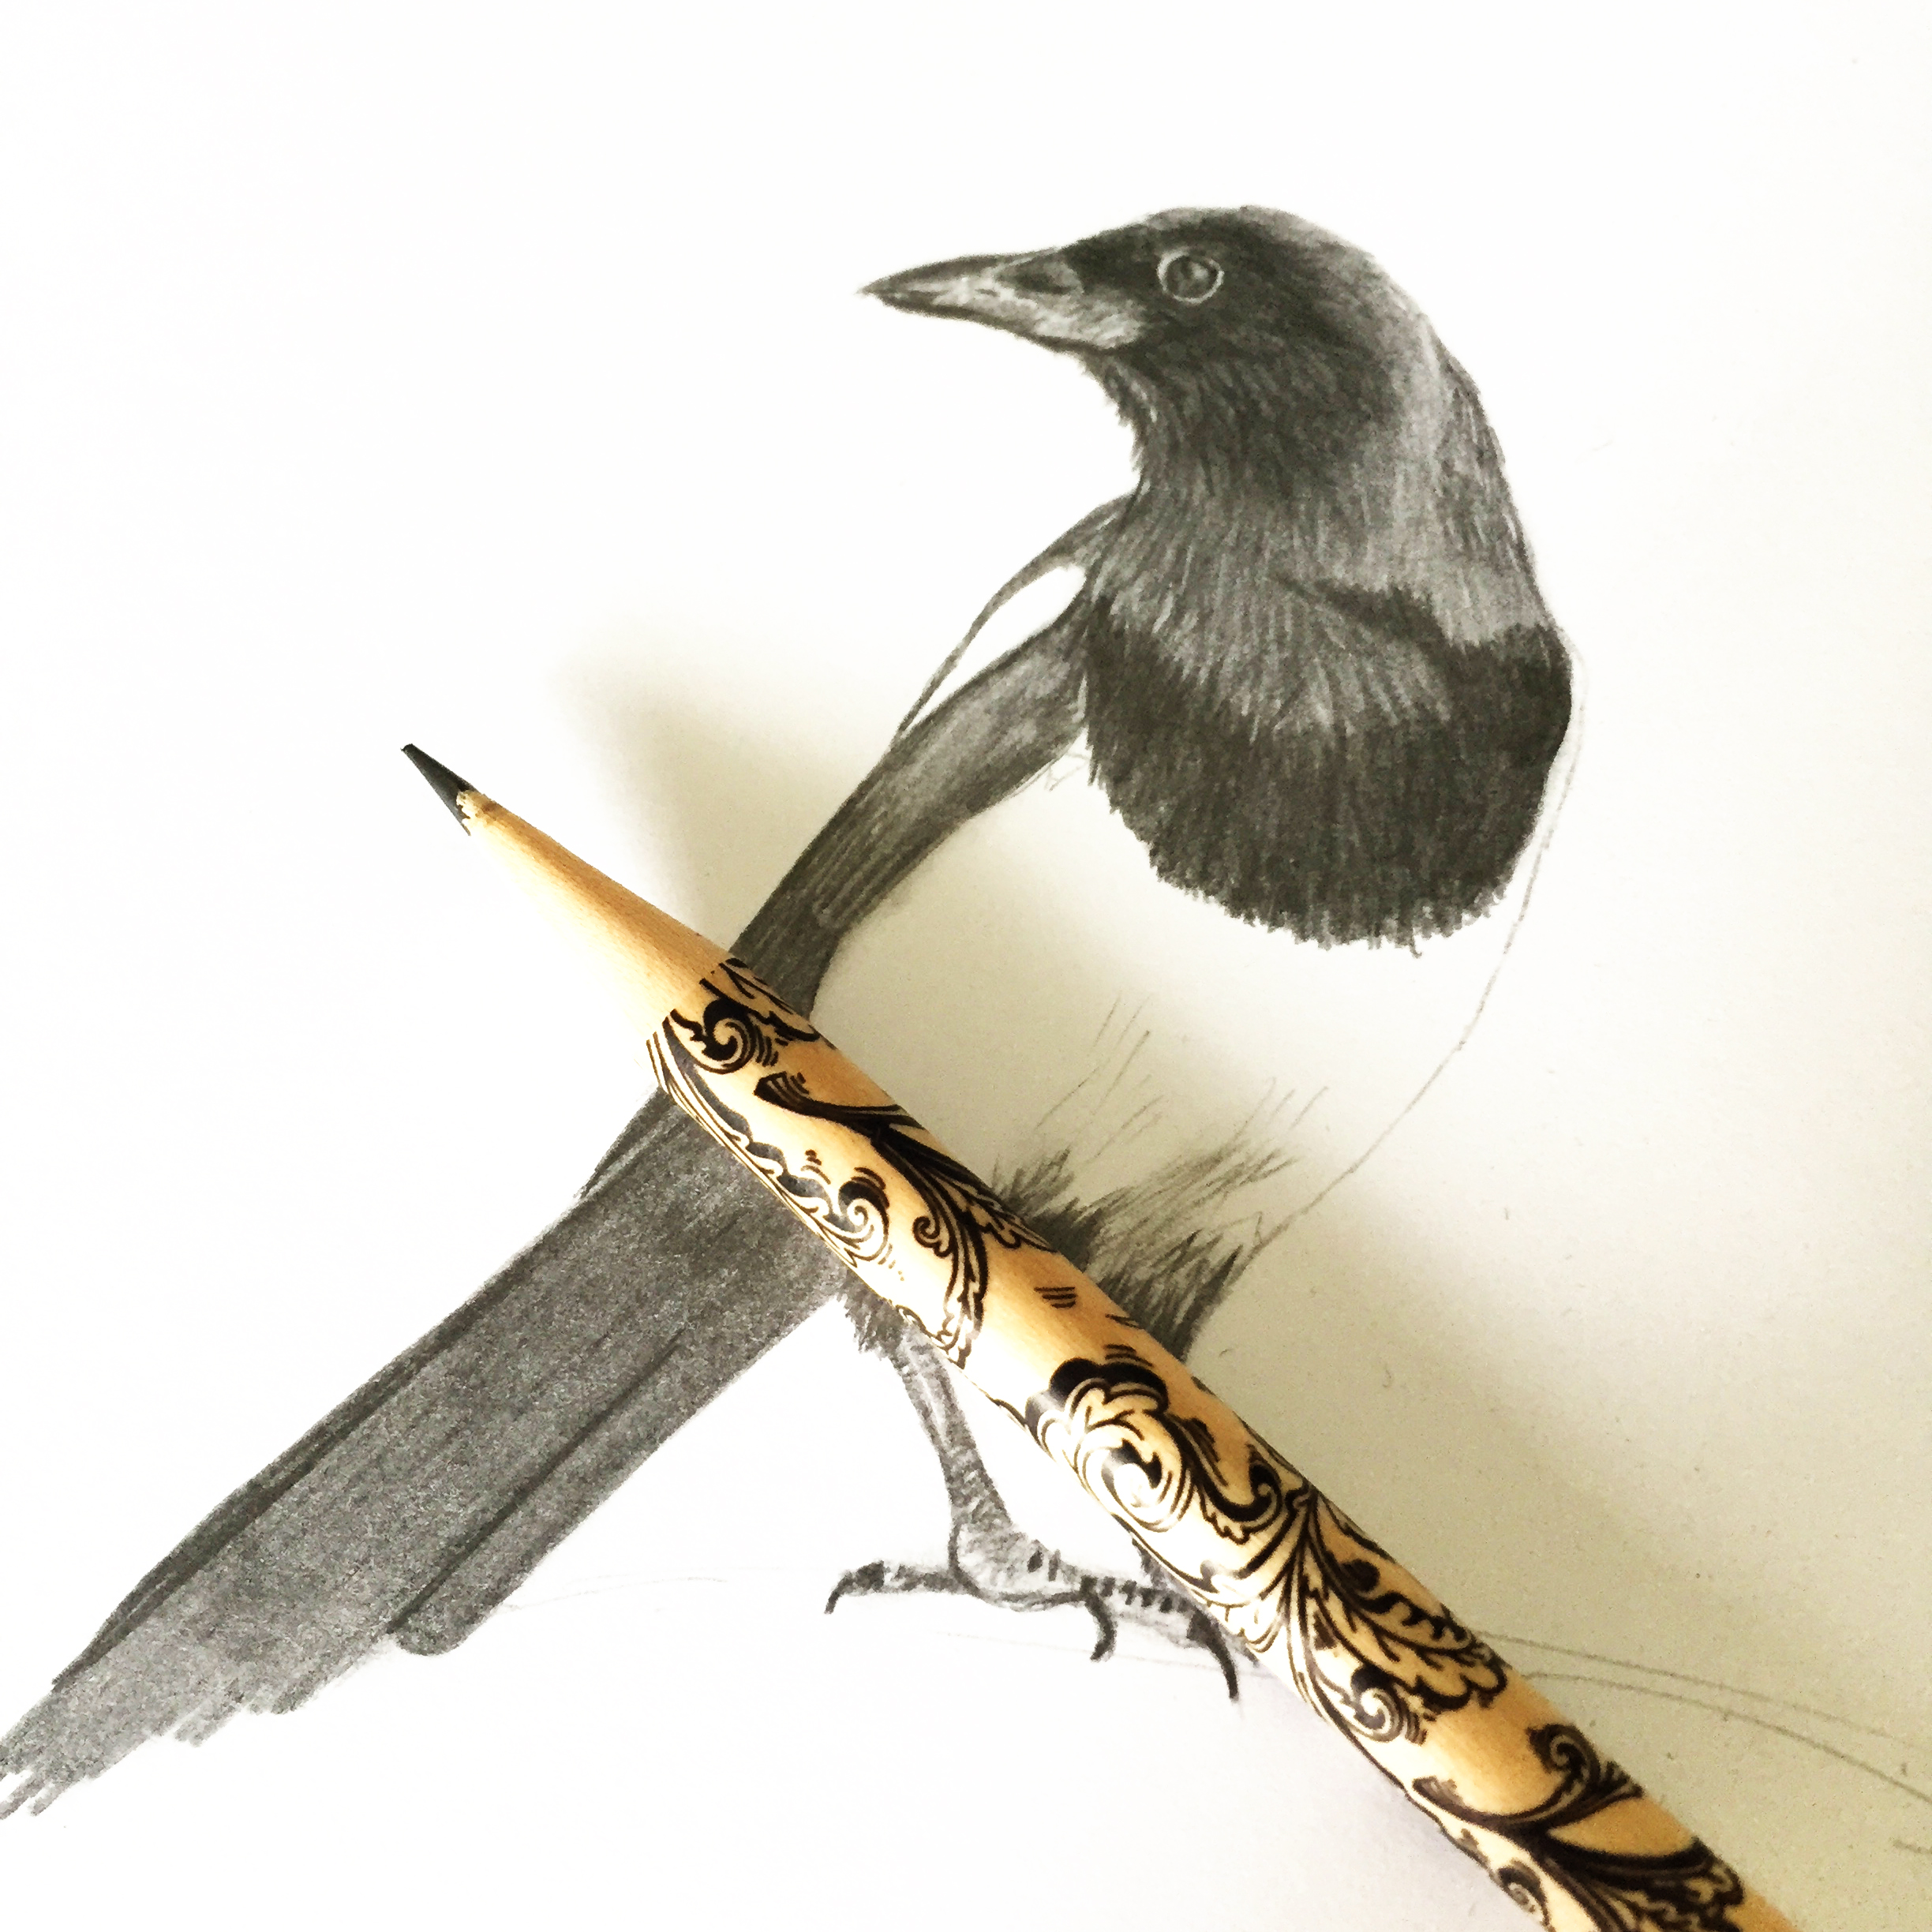
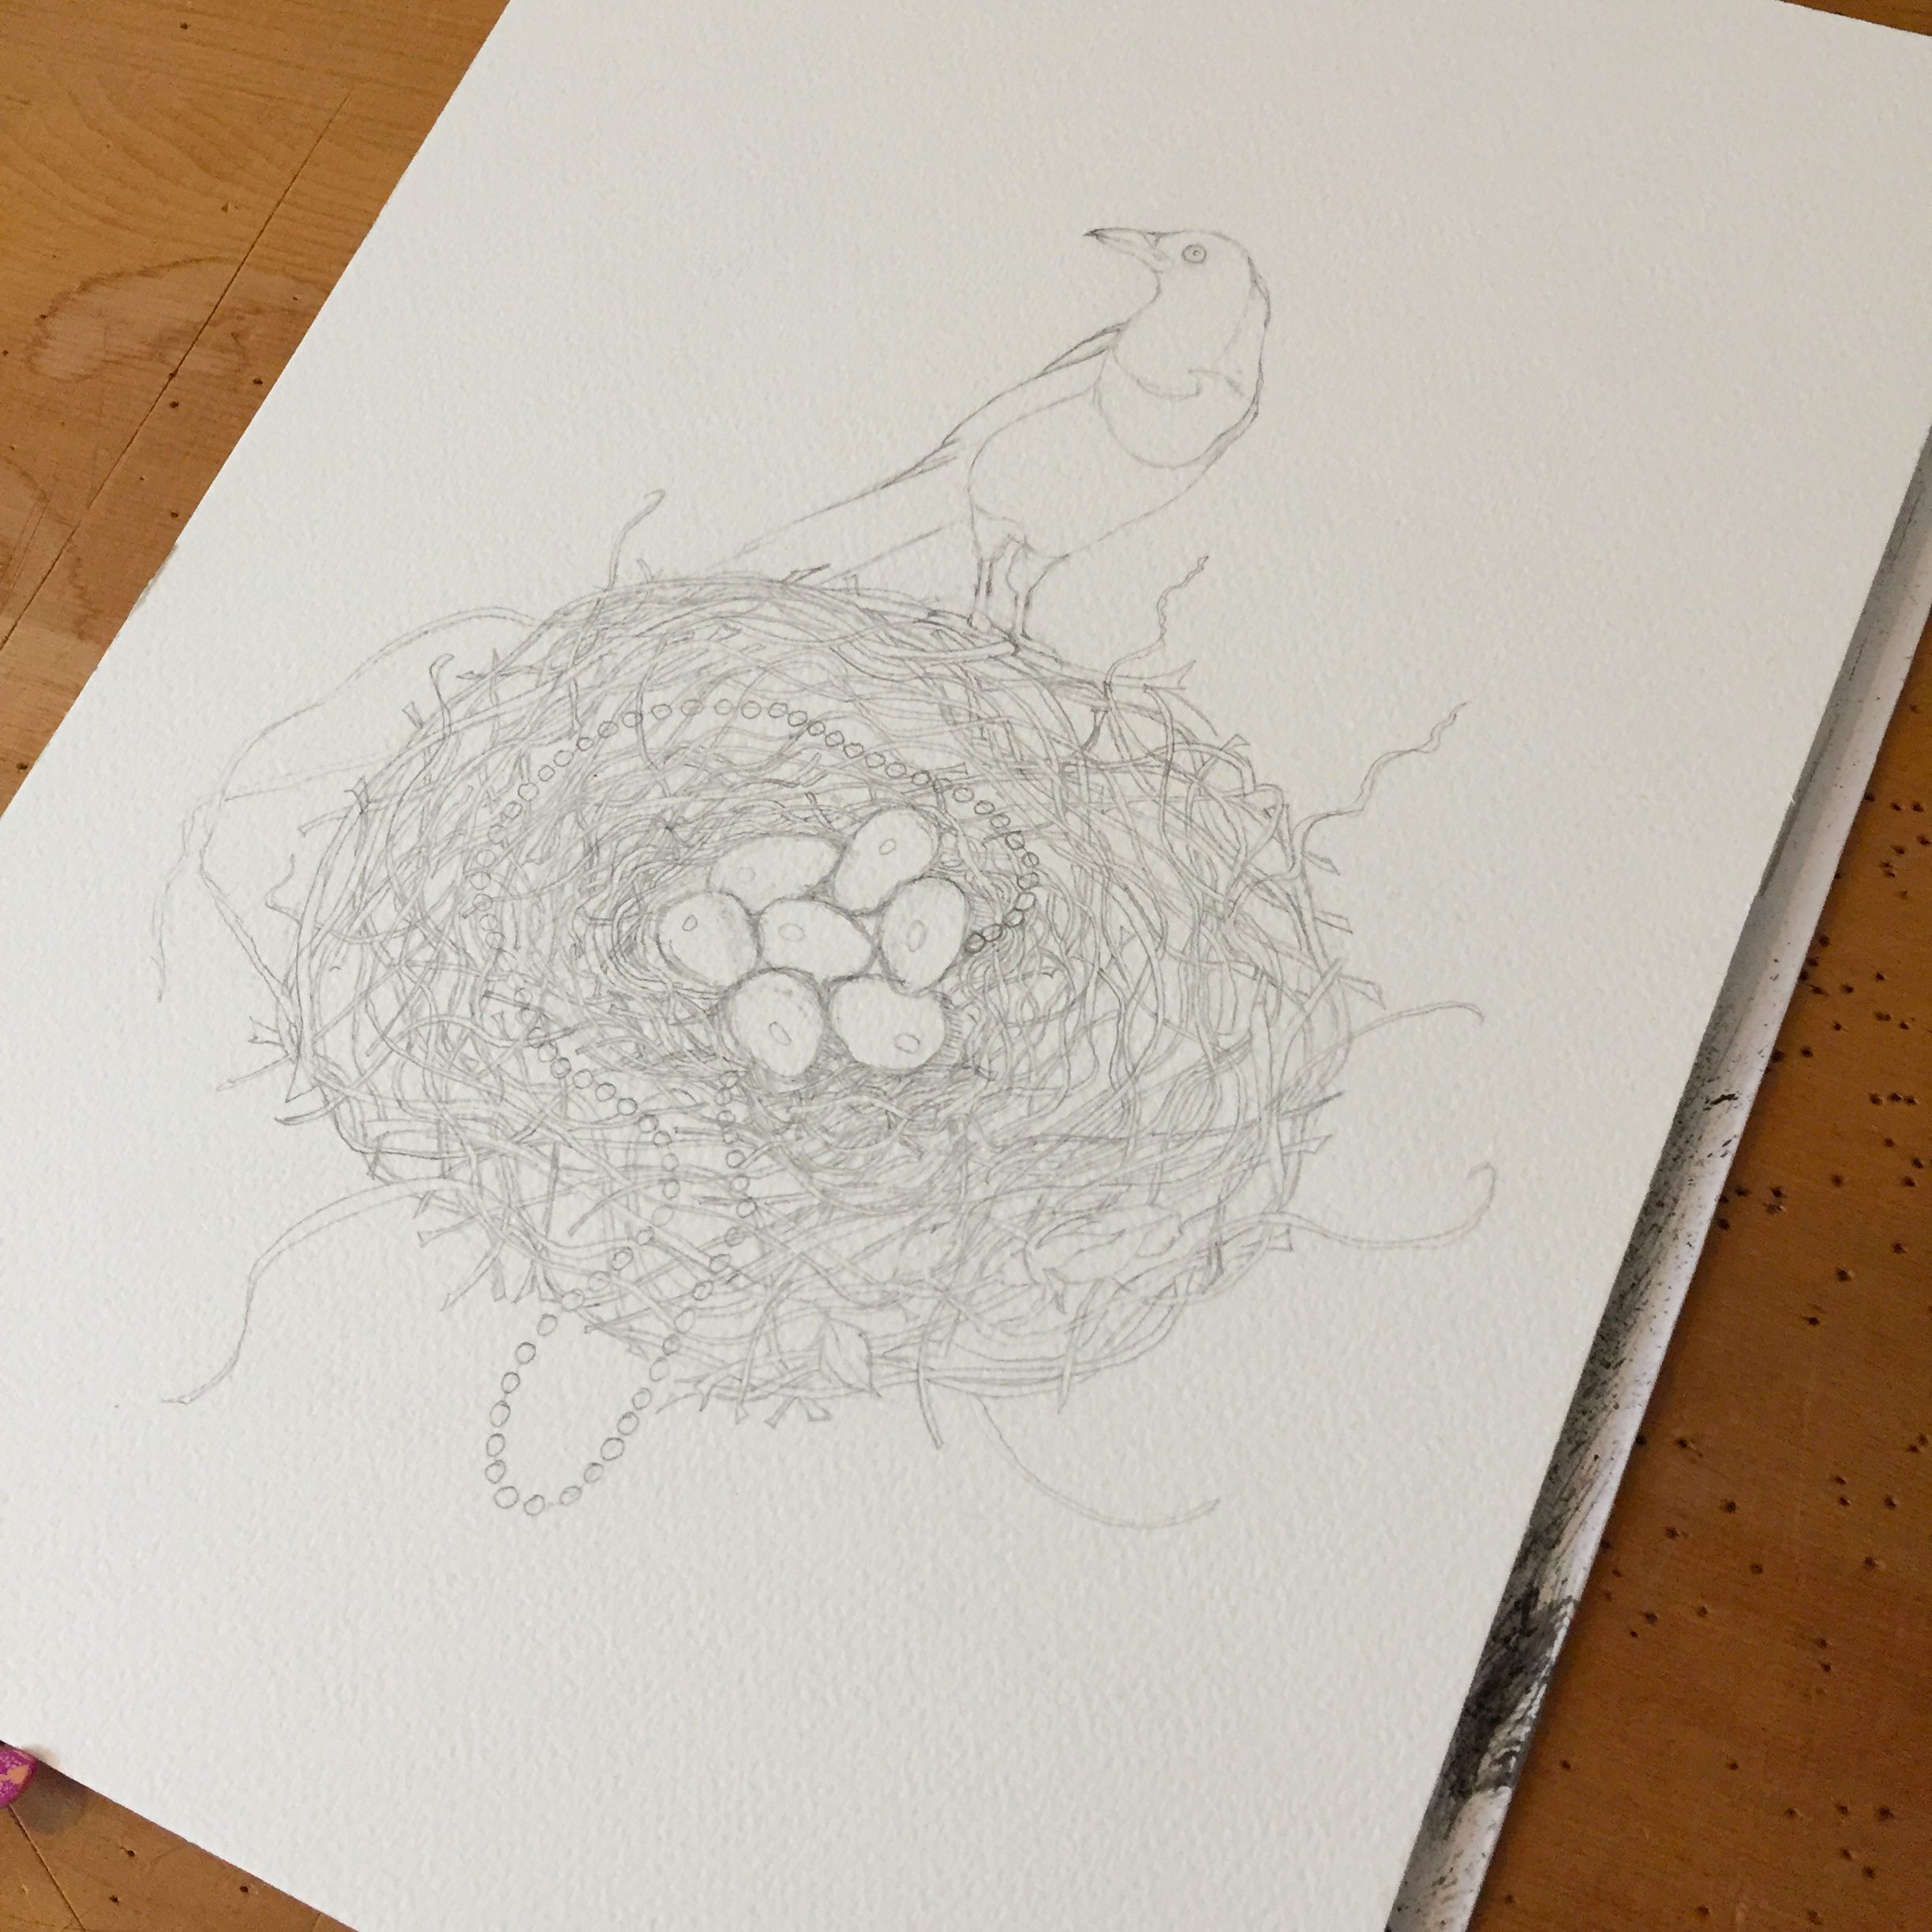
However as I was sketching I noticed all of the subtle colour details within the magpies feathers. Although initially they look black and white, magpies have purple and blue undertones to their feathers. It was at this stage that I decided to start a watercolour picture and as a lover of detail I started to want to draw the magpies nest as well. The first stage was to transfer the sketch onto watercolour paper.

Picture showing sketchbook image of magpie and transferred watercolour sketch

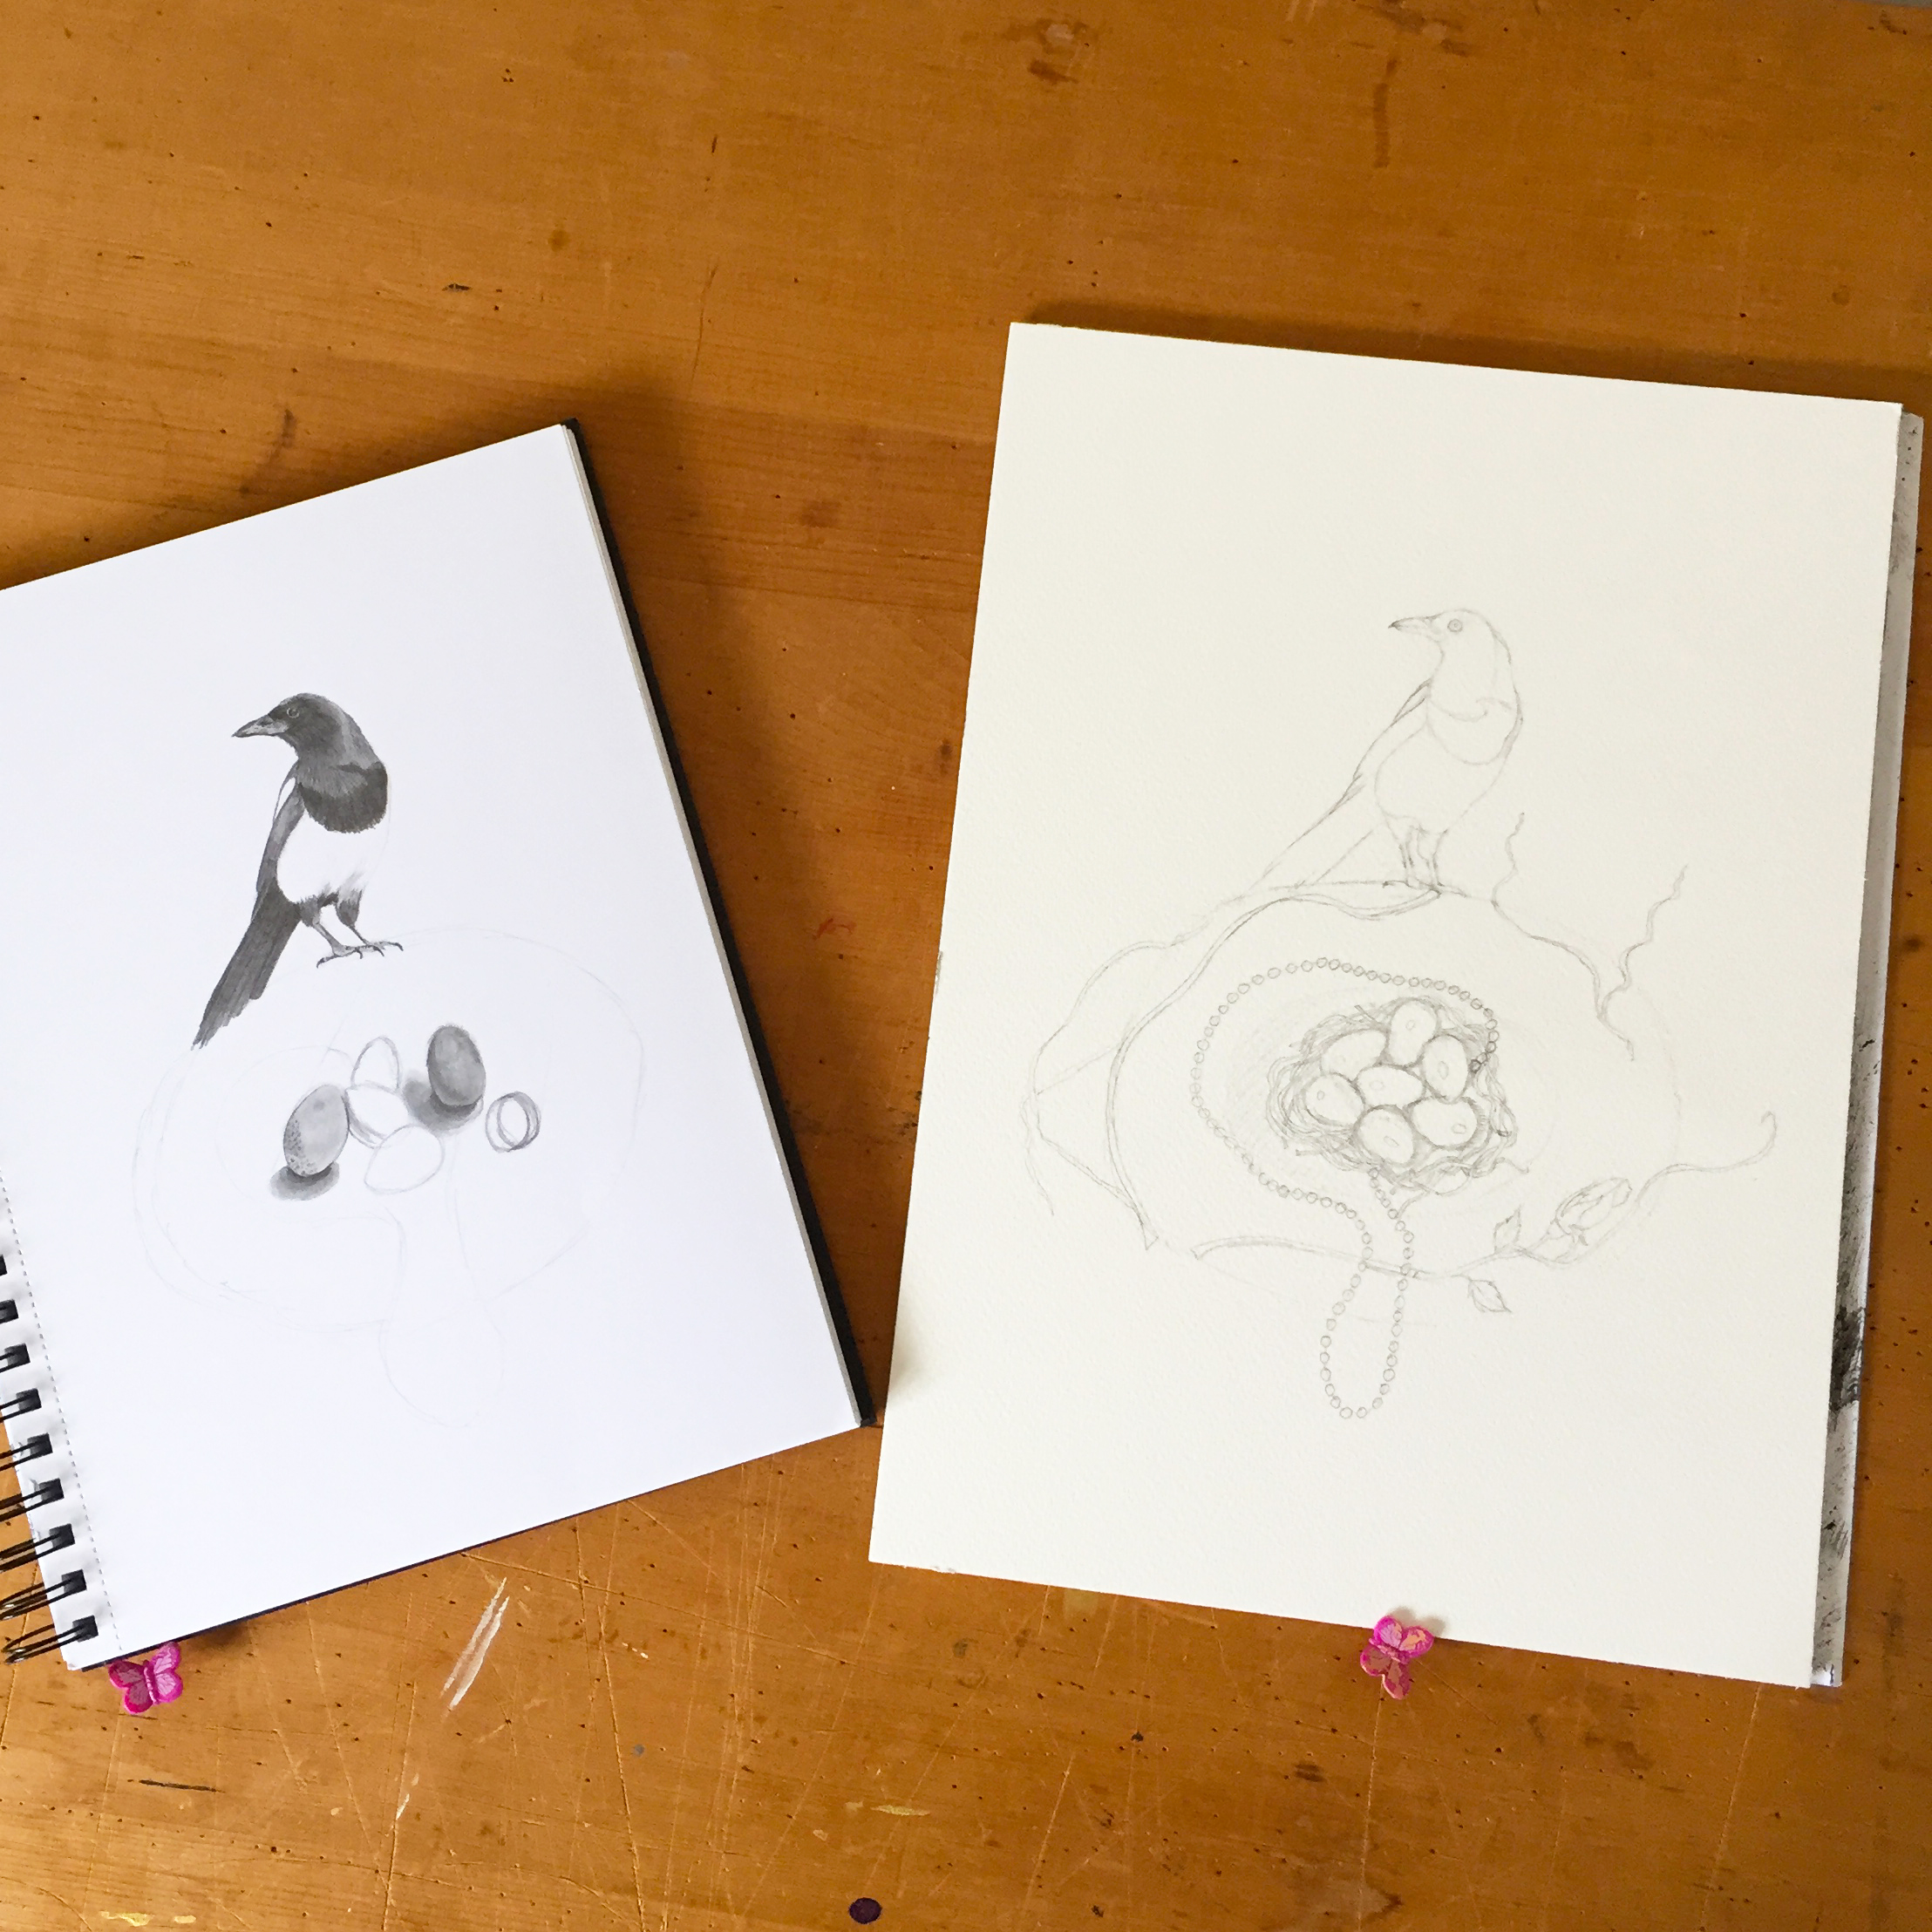
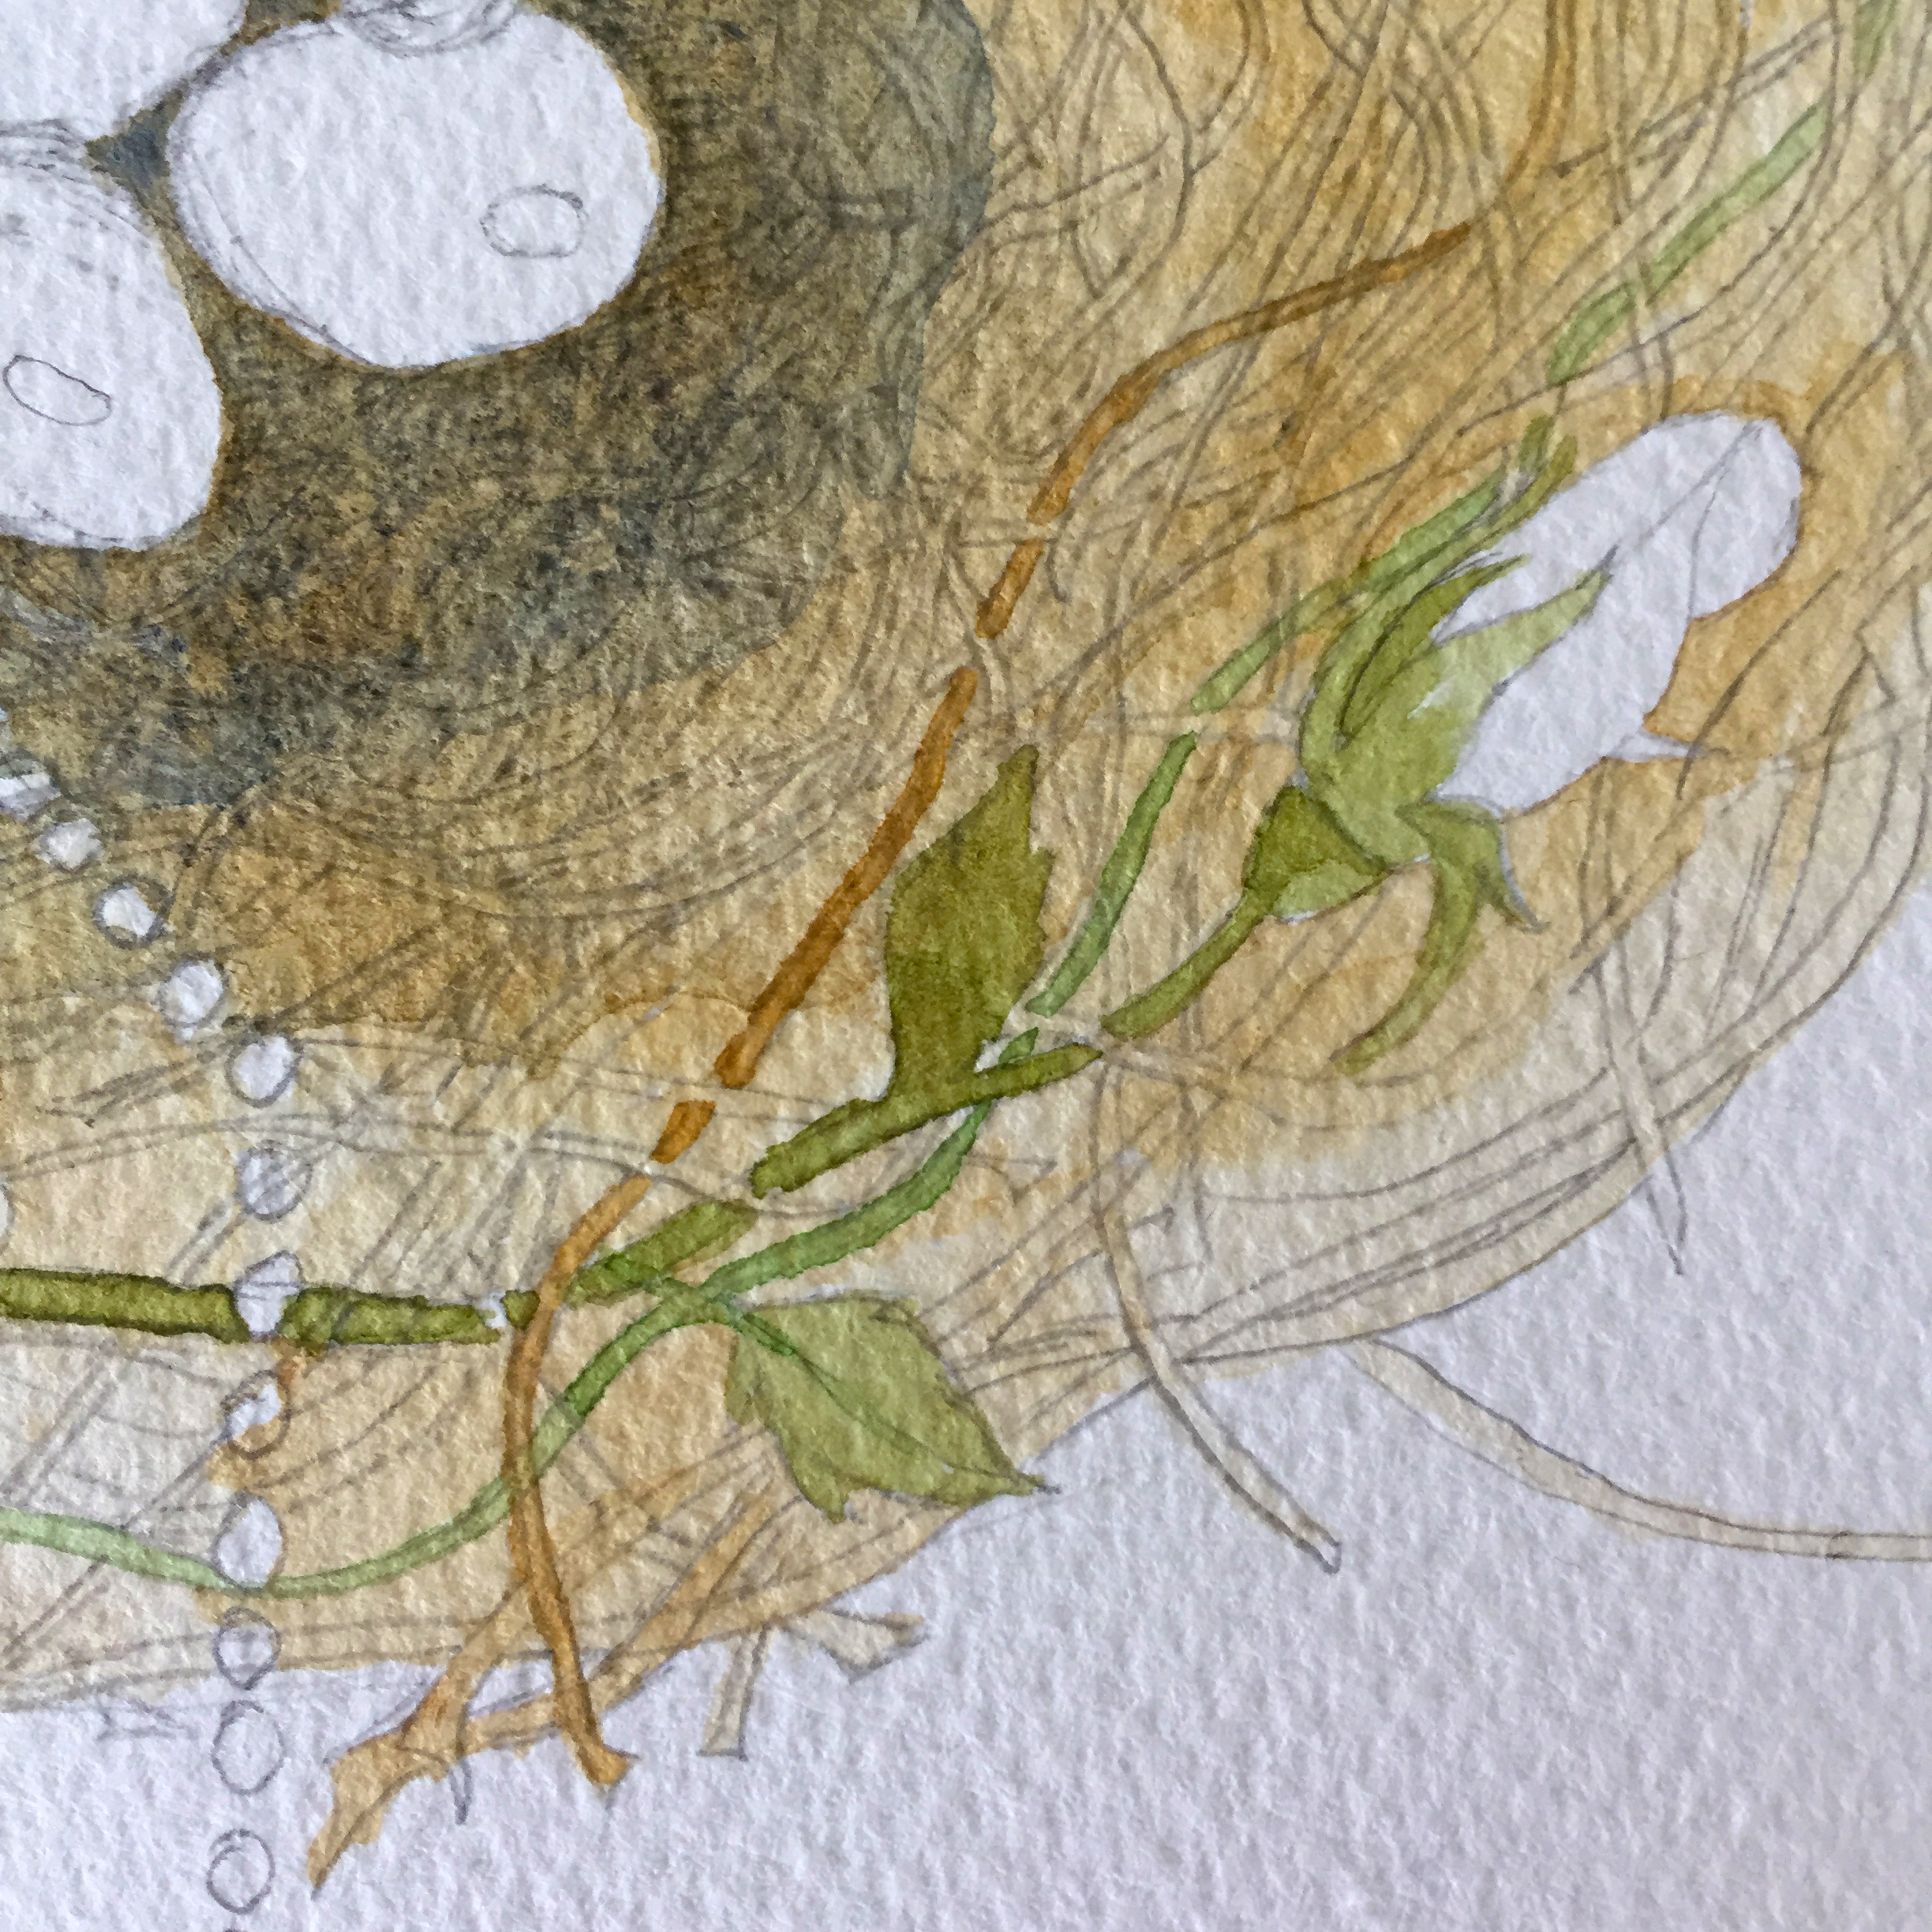
As mentioned above, I am a sucker for detail, and loved the idea of weaving other elements into the magpies nest. Magpies are known lovers of pretty things, and I love all things vintage, so I included a pearl necklace woven into the nest. Then as my surname is Rose I incorporated a rosebud into the nesting material. Here is the basic sketch of the picture.

A photograph of the finished Magpie pencil sketch

I decided to start painting the nest first, purely as I was quite confident about painting the magpie, and I didn’t want to end up ruining my picture. I did a wet on wet wash using a Burnt Sienna and a Burnt Sienna/French Ultramarine black mix for the shadows. Unfortunately the blue granulated, which is a known effect for Ultramarine blue, so lesson well and truly learnt! I then added different colours to highlight some of the nesting material and painted the rose.

A photograph of the nest in the process of being painted with watercolours

A close up of the rose woven into the magpies nest

A close up of the magpies nest painted


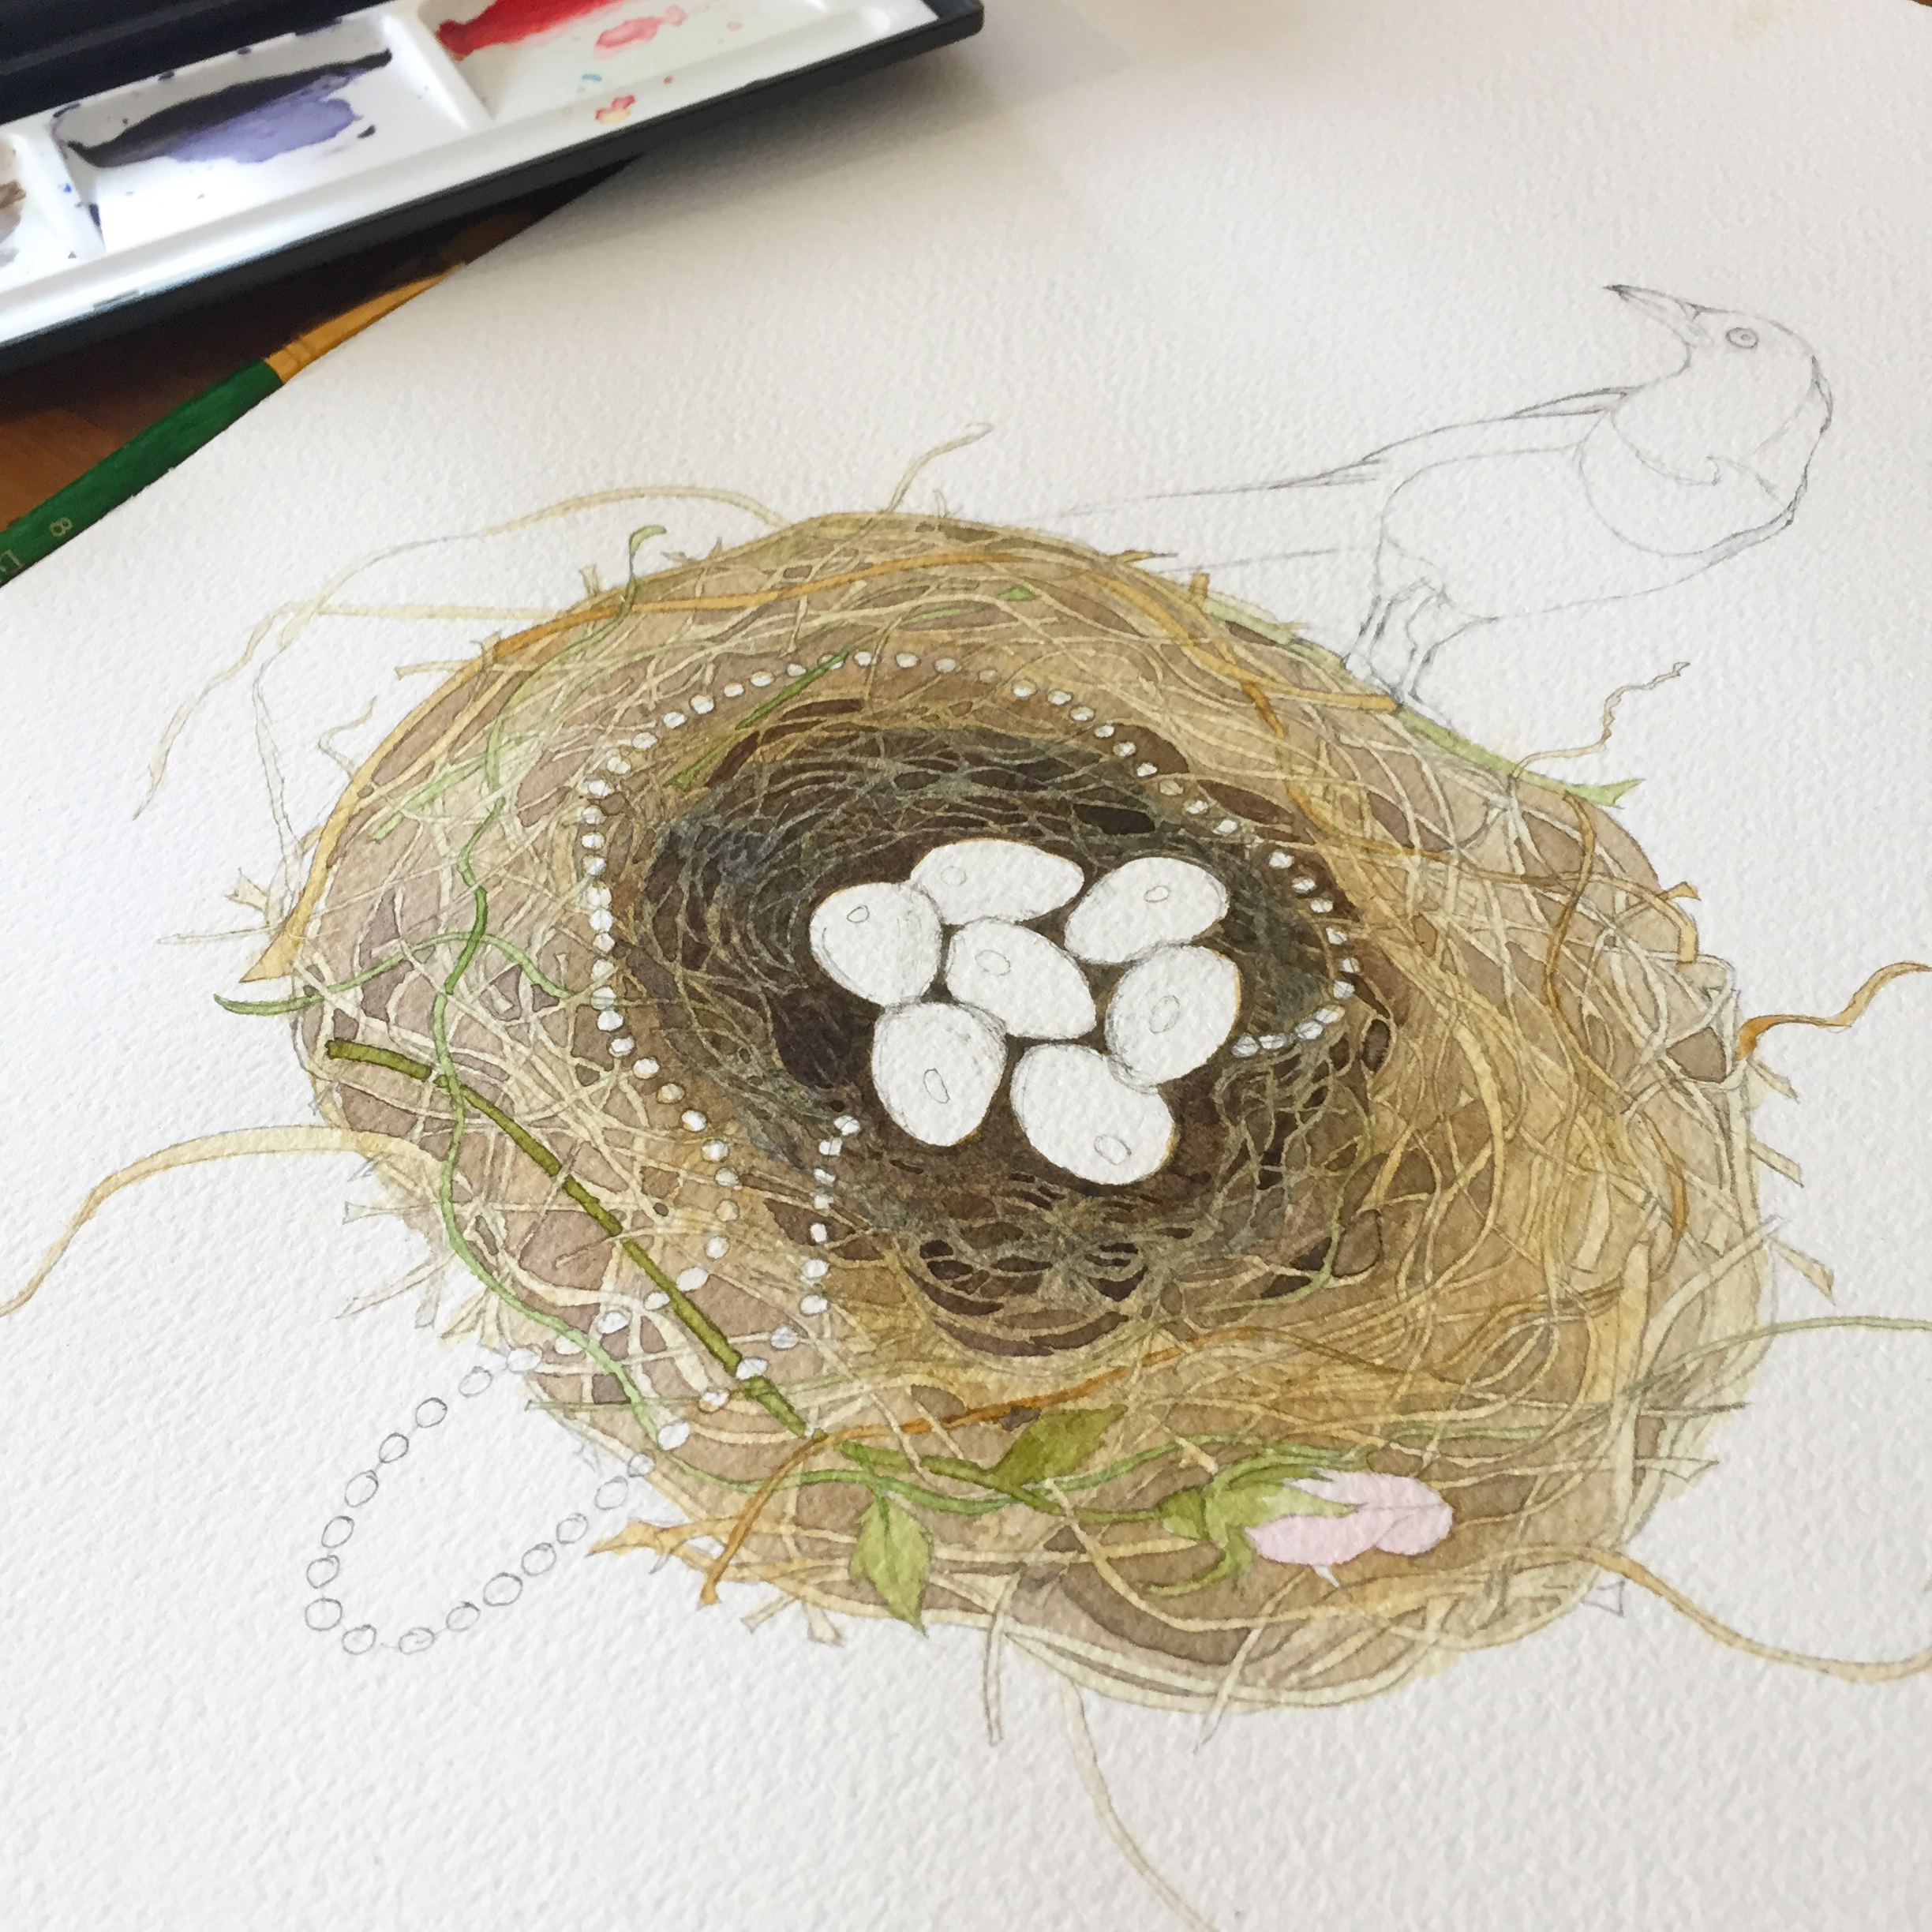
I was fairly pleased with the look of the painting so far even though the shadows in the nest didn’t quite work as I had planned, but I decided to work with this and carry on to the next stage: painting the magpie. I loved this stage so much and in my instagram feed (@jerrirose) I stuck up some videos of the process. I did wet on wet again but used a different blue for the black mix. Waiting for each layer to dry was easier than I thought and the magpie came together fairly quickly.

A close up image of the detail of the Magpie Watercolour Painting

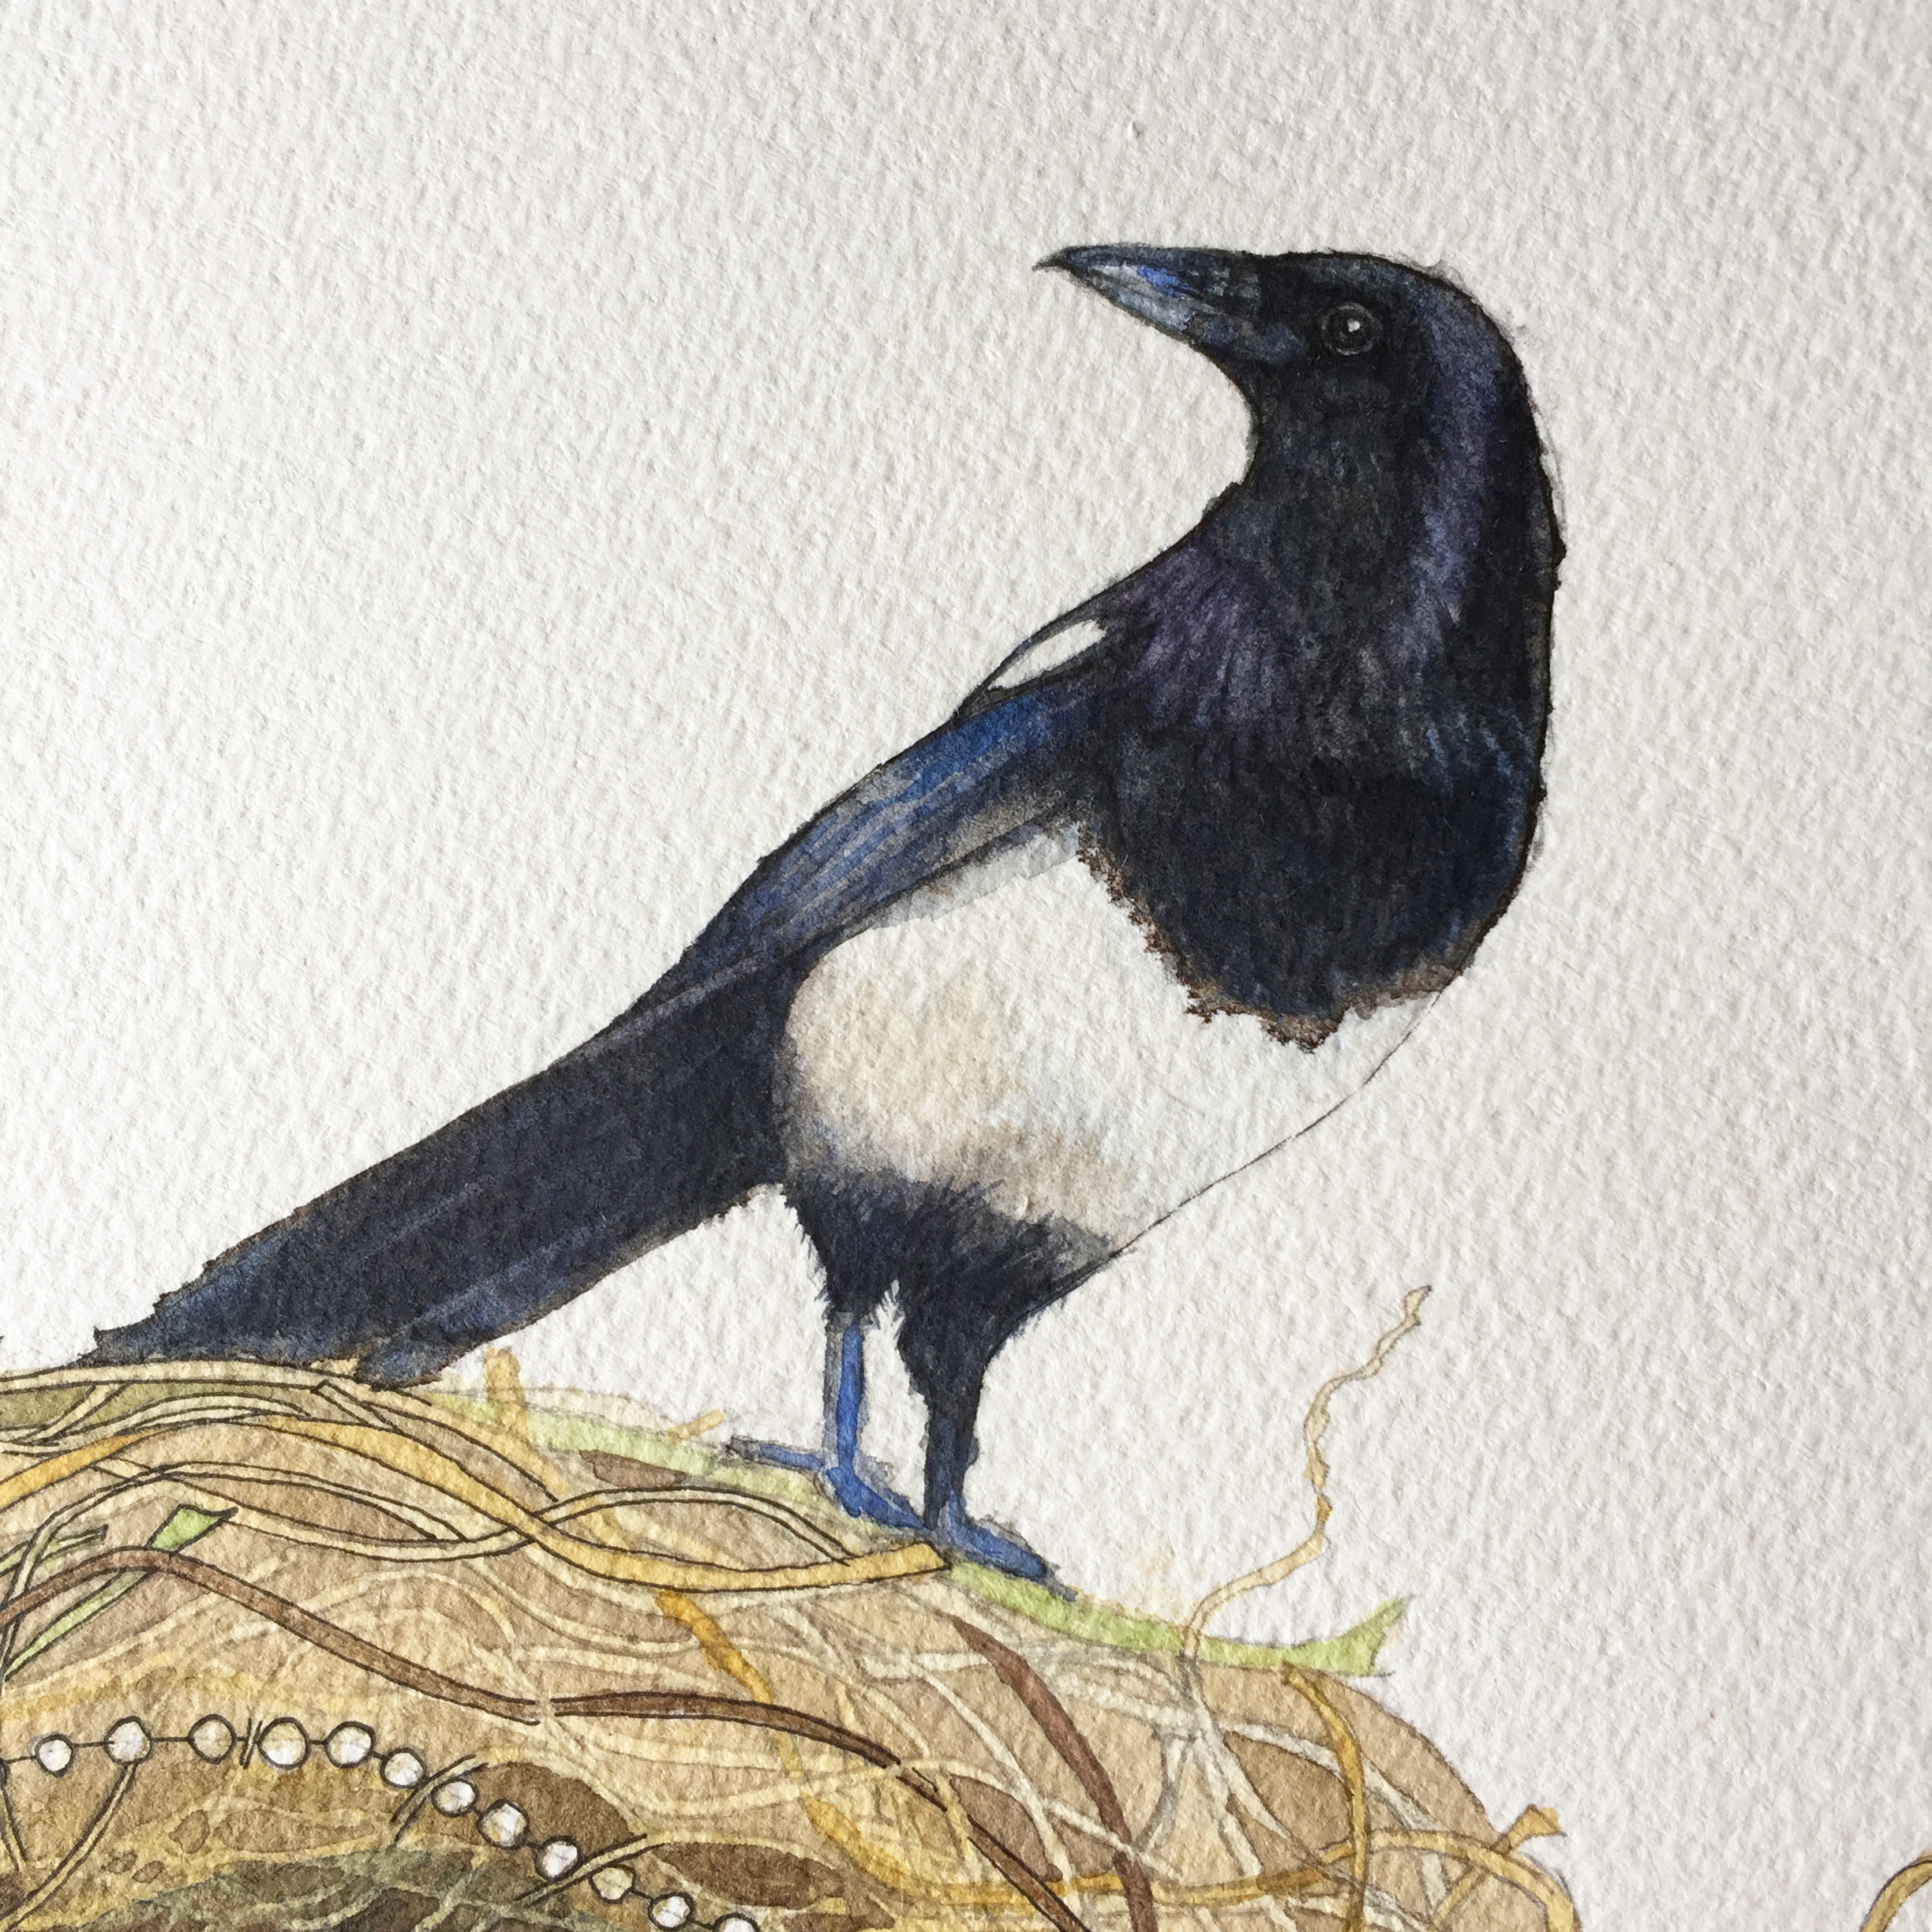
Now it was decision time. Should I ink the painting or not? My husband said no, so I thought I would…obviously. Once started I was quite pleased with the look that the ink gave the painting. It definitely helped to define the nest area better. I used a 0.05 ink pen for this task as I like quite fine lines.

A photograph showing the magpie watercolour painting with the inking half finished

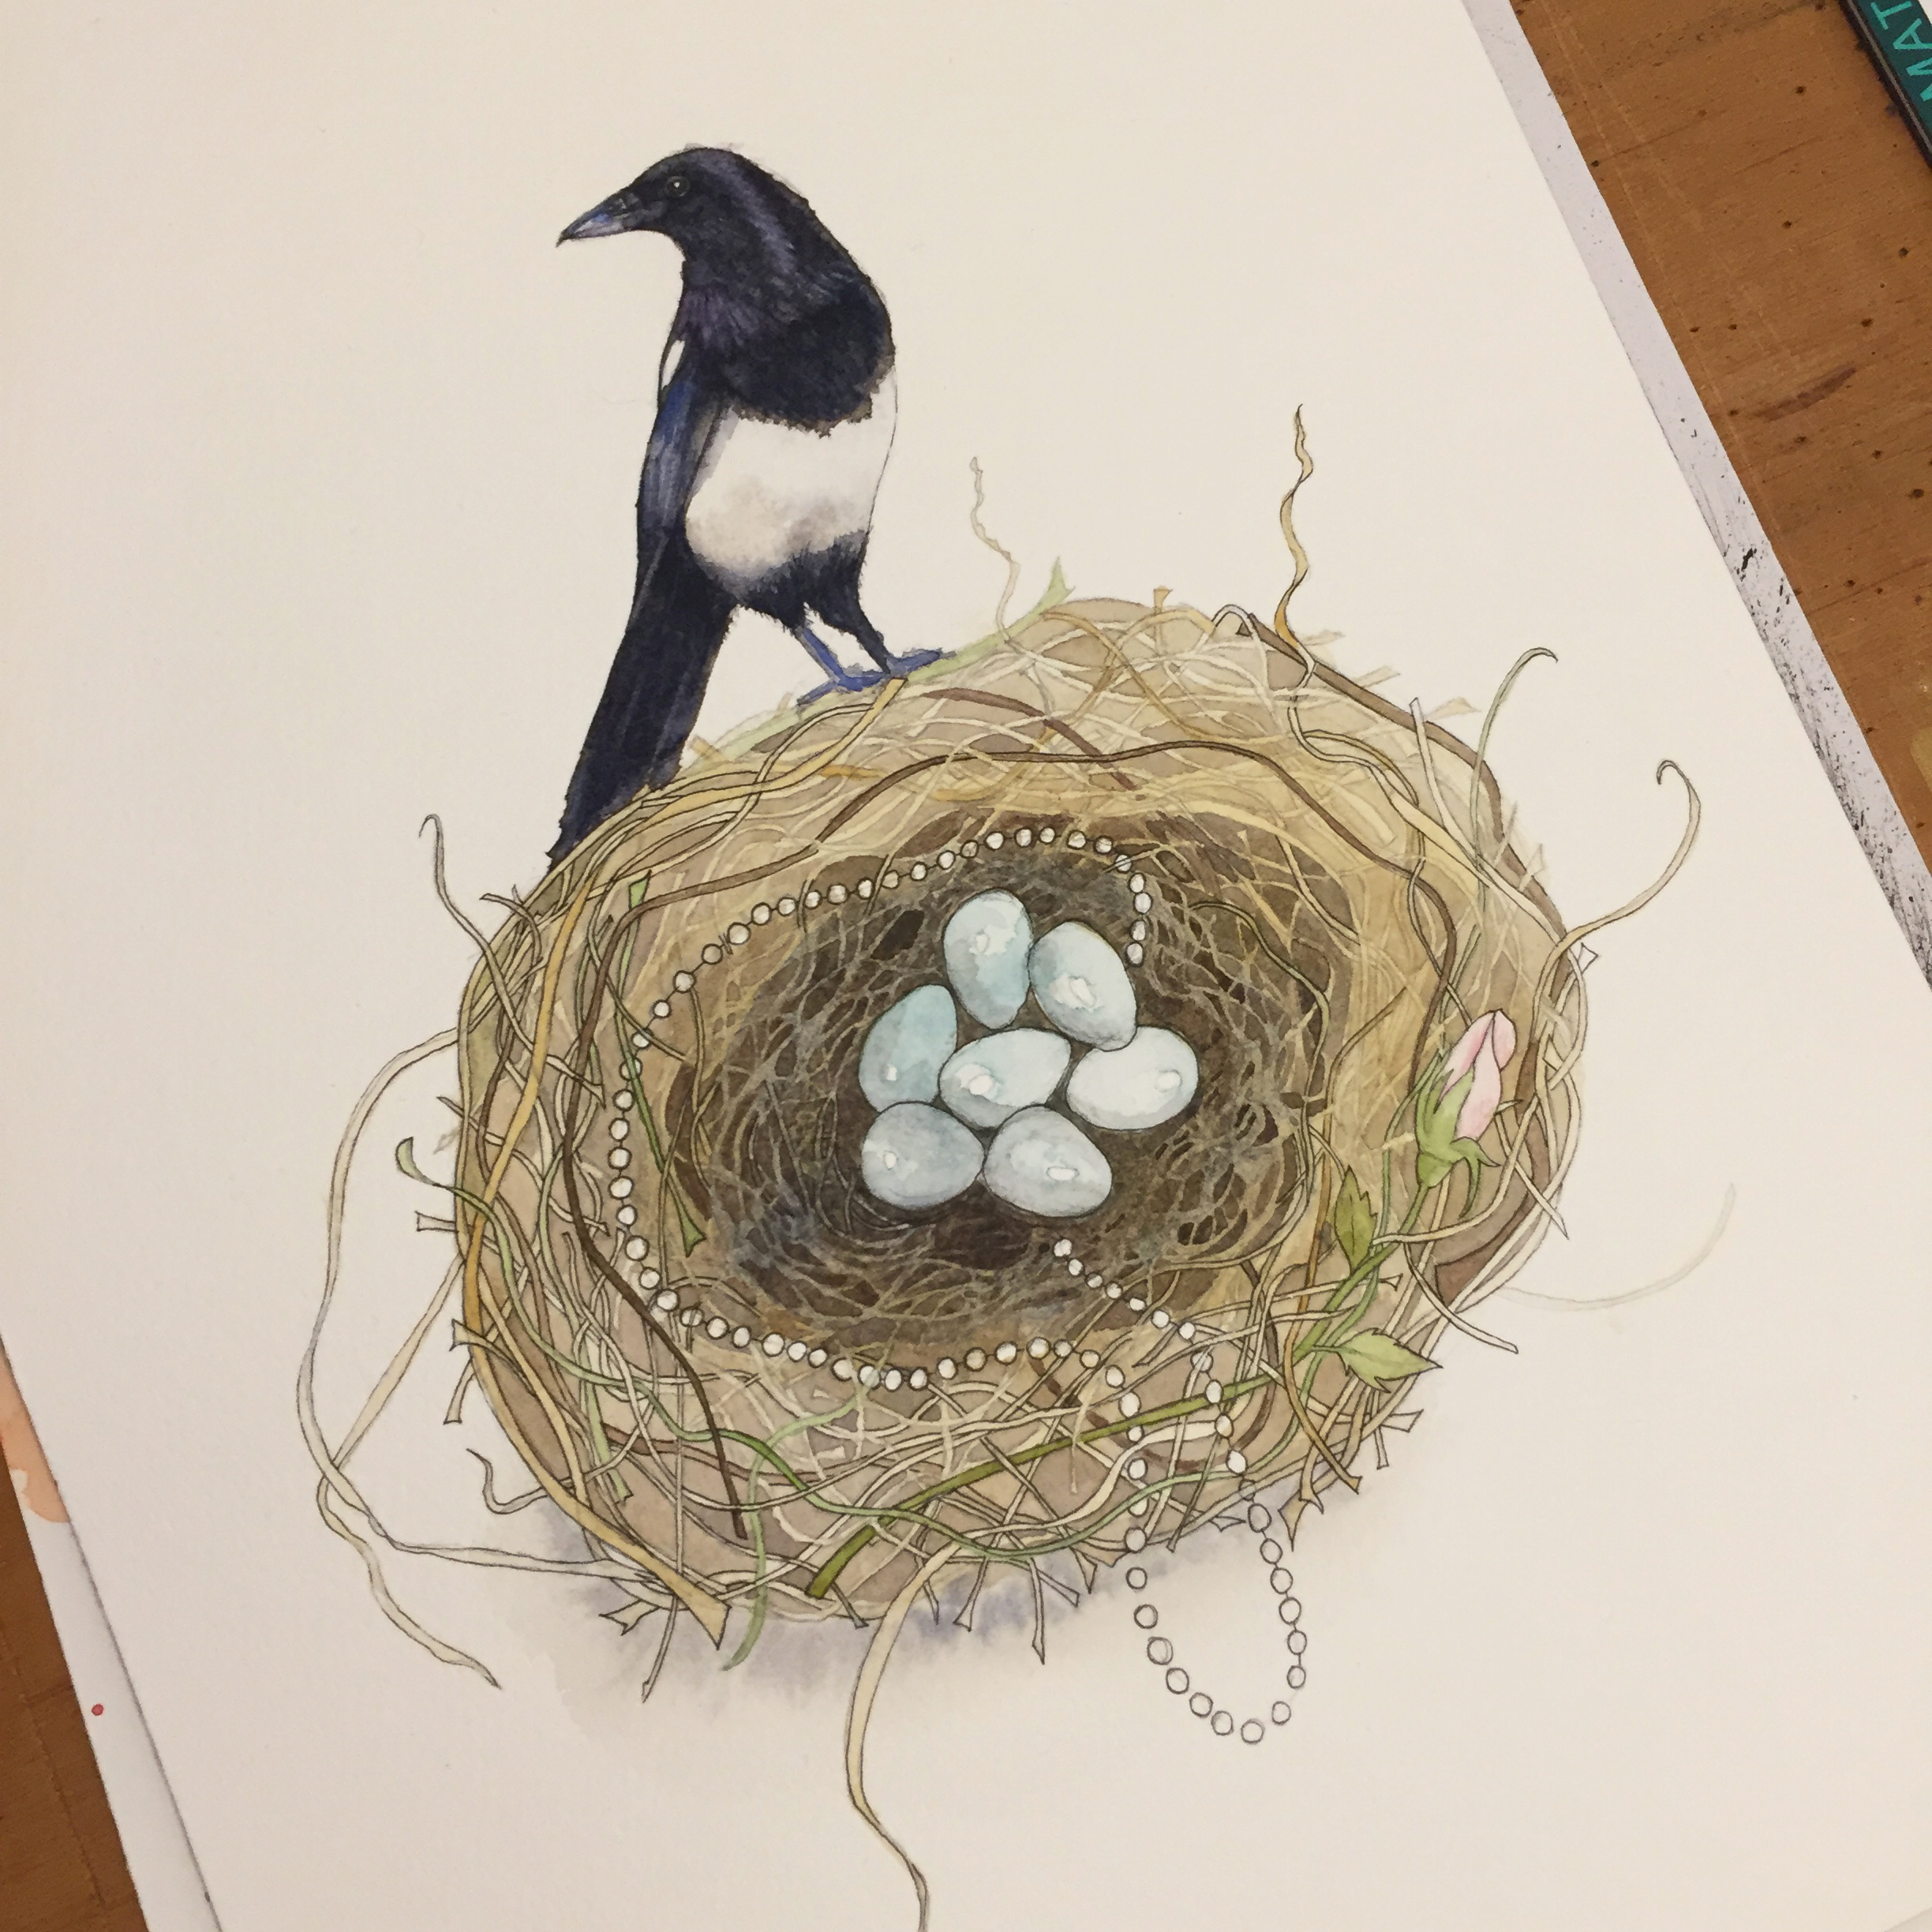
Then finally the painting was finished. Now I just have to decide how to reproduce this painting for prints and get it stuck in my Etsy shop with lots of detailed shots!

A close up of the finished magpie painting


Posted on

Come down to the woods and play: Make your own woodland inspired play mat


You can create uniquely beautiful handmade play mat for your baby or toddler using felt, a sewing needle and plenty of creative juices. This project has been made using super strength stitching methods to ensure that it survives the exploratory nature of most toddlers. My toddler has been bouncing his wooden log all over the place and I can report that it is still in one piece! Woodland Playmat Tutorial by Peacock Crafts   What will I need? Materials

  • Felt in your chosen colours and complimentary coloured thread. (Be as creative as you like, but if you would like to follow my design I used the following colours from seamstar.co.uk; Chestnut/Cream/White/Red)
  • Toy Stuffing.
  • Embroidery Floss in Dark brown and Light Beige.
  • Cotton thread in white, red and dark brown.
  • Velcro Dots.
  • Square Green rug. (Ikea do a brilliant one – here)
  • (Optional) Woodland creatures such as Foxes, Rabbits, Teddy bears or Hedgehogs.

Woodland Play Mat Materials   You will also need;

  • A sewing needle or a sewing machine
  • Scissors
  • Something to mark the fabric with for cutting out the shapes, like dressmakers chalk.

Step by step instructions.

For the toadstools:
Go here and follow the excellent instructions on this blog: The Little House by the Sea blog I decided not to add on the windows and door details, but feel free to add them.

For the wooden log:
Step 1: Cut out two lengths of 75cm by 50cm in the chestnut felt.

Step 2: Placing the two right sides together, sew along one seam using either a back stitch (strong seam) or a sewing machine. If you use a sewing machine ensure that you stitch back over the initial stitch or lock stitch over the end of both seams to secure your sewing.

Woodland Play mat Step Three

In my vast craft collection I have a mega embroidery hoop to help with this step. Using the light brown embroidery floss, stitch a pattern on the brown felt which resembles bark. Don’t think too hard about this, I used backstitch in wonky lines up the length of the log and threw in a few knots in the bark. Alternatively you can stitch the lines and circles on with a sewing machine – this will probably be a lot quicker. See the photo above for ideas and inspiration.

Step 4: Secure a square of the light brown felt into a 9″ embroidery hoop. With the dark brown embroidery floss, stitch circles using backstitch or split stitch, depending on how thick you want your line. See the image above.

Step 5: Cut out the circles from the light brown felt allowing a 5cm seam allowance.

Step 6: Take your dark brown trunk felt and placing right sides together, sew up the remaining seam as before using either backstitch or with a sewing machine. Again if using a machine, ensure you lock the ends of the seams.

Step 7: Keeping the main body of the trunk inside out, place one of the light brown circles on the end of the trunk with the right side facing inwards. Pin the light felt to the dark felt and keeping a 2cm allowance all around, hand stitch the felt together.

Step 8: Place the remaining light brown circle on the other end of the trunk, again with right side facing inward. As above secure the felt with pins leaving a 2cm allowance  and stitch the felt together. This time leave a 5cm gap.

Step 9: Gently turn the log inside out through the 5cm gap you left. Then stuff the log with plenty of toy stuffing. Once the log is stuffed to your satisfaction, pin the gap closed and blanket stitch over the seam. Ta-dah – One wooden log pillow for your woodland fairies or elves to sleep on.

Posted on 1 Comment

You Were Born Under These Stars: How to embroider a star map for your baby

This tutorial will help you make a sweet project that looks great and sparks many memories for Mummies and Daddies of the day they became a family or an even bigger family! Easy to make, the embroidery project is simple in both the set-up and execution. I found that I could silently stitch away whilst my baby slept. I also love the fact that I have made something unique to him as the stars are in the correct positions down not just to the day, but the hour, minute and location of his birth.

What will I need?

You can buy a kit for this project from my Etsy shop which includes all the materials needed plus a personalised star map.

Alternatively you will need to purchase these items:

  • Navy cloth
  • Metallic silver thread
  • Grey thread
  • Silver star sequins
  • 9in Embroidery hoop

Star Chart Materials Pic

Step by step instructions

The first step is to obtain a star map for the date and time of your babies birth. I managed to draw up my own and you can purchase a personalised star map from my Etsy shop,

The Guardian website does produce monthly star maps which you could work with.

Guardian Star Charts
Star Chart Step One

Once you have your star map, resize it so it will fit in your embroidery hoop (9in circle) and print it out onto A4 paper.

Star Chart Step 2

Separate the inner and outer embroidery hoops. Then cut a rough square of fabric out of your navy cloth and lay it over the inner embroidery hoop, there should be enough fabric overhanging the hoop to allow you to pull on it to stretch it. Place the outer hoop over the top of the inner hoop which will catch the fabric between the two hoops.

Slightly tighten the screw at the top of the embroidery hoop and beginning to pull the fabric at the back of the hoops. You should now slowly work your way around the hoop pulling the fabric tight and tightening the screw at the top. Take care not to over tighten the screw was this can place stress on the hoops, especially wooden ones.

Once you have done this you should have a nice tight piece of fabric to work on. The aim to to produce a taut surface to stitch on to which doesn’t pucker or twist as this can result in uneven stitches.

Star Chart Step Three

Pin the paper star map onto your embroidery hoop, ensuring that north lines up with the top hook. Then you simply need to just poke a needle through the paper and the cloth beneath, wiggle the needle around a bit to make an obvious hole in the material, then use the metallic thread to create the lines between the stars.

Depending on how you work you can either stitch an entire constellation and then stitch on the stars, or you can use the metallic thread to stitch all of the lines first then go back over and add in the stars. Either way work your way across the print out adding the lines and the stars. To attach the star sequins I simply took my thread up through the centre of the star, down each side of the star, using just two stitches. You should be able to see the stitching in the picture above which illustrates this step.

Once you have completed your design you can trim off the excess material leaving about 2cm of material around the hoop. You can either glue the material to the hoop if you are happy with your design and want to make it permanent or you can tuck the material behind the hoop and just hang onto your wall.

Posted on

Starry Night Owls: How to make your own felt owl baby mobile

This is a fun, simple woodland themed project for crafty inclined people to make for that special baby in their lives. A few pieces of felt, some thread and a simple bit of stitching can help you put together a beautiful unique mobile. By using the templates and instructions below you can create a quirky woodland scene complete with owls, stars and the moon, you can even customise it yourself by using different coloured felt.

Starry Night Owl Mobile Overview

What will I need?

Materials

  • Felt in your chosen colours and complimentary coloured thread. (Be as creative as you like, but if you would like to follow my design I used the following colours from seamstar.co.uk; Chestnut/Cream/White/Dahlia/Fawn/Sable)
  • Toy Stuffing
  • A wooden dowel rod (I used 2 x 46cm lengths)
  • A screw type metal hook
  • (Optional) A battery-powered mirror ball motor (I got a white one from Maplin)

Starry Night Owl Mobile Materials

You will also need;

  • A drill to make holes in the dowel rod.
  • White paint to paint the dowel rods.
  • Glue to stick the two rods together.

Step by step instructions

Starry Night Owl Step One

Print out the below cutting guide (.pdf file) onto thickish card and cut out the shapes.

Click here for the cut out guide

Cut out individual shapes from the appropriate colour felt as per the instructions on the cutting guide. I cheated a little by folding over the felt and cutting through more than one layer to speed up the process. This actually helped to produce identical wing shapes and body shapes which made the owls look neater.

Starry Night Owl Step Two

(n.b) You can either cut out all the pieces for one owl and then sew it up if you like to see a quick result from all your hard work, or cut out all the pieces needed for all five owls and stars/moon shapes and then approach the project like a mass production machine. However you chose to work, just follow these steps for each owl shape.

Place two pieces of felt together for the wing and stitch them together using backstitch to form one wing, repeat for the other wing. Then sew on the friendly features of your owls, the eyes and the beak. I used satin stitch for the eyes and beak.

Sew on your orange coloured little owl legs to the main darker coloured body piece.

Attach the light coloured body and face section onto your main darker coloured body section again using back stitch, you don’t have to worry so much at this stage about keeping the back of the stitching neat as this won’t be seen when you build your owl.

Attach the wings and the tail pieces on to the back of the main body section, do this loosely as you will be stitching over this part again.

Now you can attach the back section to the owl using back stitch, leaving a finger-width hole at the bottom to allow you to stuff the owl. Try to keep your back stitch as neat as possible on both sides of the owl as you will see them in the finished piece.

Stuff that bird! Once your bird is pleasantly plump you can stitch the hole you left closed.

Now finally you need to stick your two dowel rods together by cutting a notch out of both of them and gluing them together. Paint the entire rods white (or your colour of choice) and make small holes at the ends of the dowel rods. This is where you will be hanging the birds from. You should be able to simply screw your hook into a small hole that you make in the centre of the rods with your drill.

Starry Night Owl Step Three

Once you have worked out the arrangement of your owls and stars/moon you can simply attach them to the dowel rods by sewing through the centre of each stuffed piece. I tried to tilt the owls slightly for a perfect baby-eyed view.

Posted on

Scrumdiddlyumptious Wonka Bar Invites: How to make your own Willy Wonka golden ticket invitations

If you are a Roald Dahl fan as well as a lover of all things chocolate then this easy to make invitation may be just the ticket you need. Whilst making this project you may begin to resent giving away luscious chocolate; in which case you may need to buy a few more bars just in case some get ‘broken’.

All you require for this project is a bit of printing, some bars of chocolate, good old double sided tape and some paper. All this talk of chocolate is making me hungry.

Wonka Bar Invitations What will you need?

Chocolate bars: I used at least one bar per household, but allowed children to have a whole bar each so each child got their own special invitation. The chocolate bars I used specifically were Galaxy as they still use the old fashioned foil wrappers and the colours of the foils were complimentary to the designs I had created.

  • The Wonka Scrumdiddlyumptious Cookie-licious Milky Chocolate Bar was actually Galaxy Cookie Crumble which has a purple foil wrapper.
  • The Wonka Triple Dazzle Caramel Milky Chocolate Bar was actually Galaxy Caramel which has a gold foil wrapper.
  • The Wonka Nutty Crunch Surprise Milky Chocolate Bar was actually Galaxy Smooth Milk which has a bronze foil wrapper.

Wonka Bar Invitations

You will also need;

  • Double sided sticky tape.
  • Good quality A4 matte printer paper.
  • Double sided A4 gold card.
  • A guillotine.

Step by step instructions

Wonka Bar Invitations

Firstly you will need to design and print the new Wonka wrappers. I found that you can fit two chocolate wraps on one piece of A4 printer paper. So if you are inviting forty households you will only need twenty sheets of paper, again remember that children may not want to share the chocolate!

Below are the measurements I used for my wrapper designs which are based on the original Galaxy bar wrapper dimensions.

Wonka Bar Measurements

If you are feeling lazy or lacking in creativity or time and would like to use my design then you can visit my Etsy shop below and you can purchase the original design as a PDF which you can print out yourself. I can also alter the design to suit you, just get in contact.

For added authenticity make sure you look at the original galaxy wrappers for inspiration and think about adding things like a barcode and calorie information. Feel free to copy my colour scheme and chocolate bar names, or you could be as creative as you like and design something unique to you. You could even think about re-reading Charlie and the chocolate factory for some ideas.

Step Two

Now you need to design and print out the Golden tickets. In my design I managed to place four tickets on A4 gold card. Above is a photo of the actual wording that I used on the tickets which is based on the original text in the book.

I found it quite difficult printing on the gold card as the ink from my printer seemed to sink into the card but I consulted my local tech guy (my husband) and we managed to tinker with the settings to get something usable.

Wonka Bar Invitations

Now you need to cut out all of the wrappers and invitations using the guillotine. This step is quite laborious if you have a few invitations to prepare so stick on some tunes and get into your cutting groove!

If you are sending more than one invitation to a household try and send different bars so that they get a selection, I also tried to think about sending different bars to each family group so that when they got together they had the whole creative collection!

Once all the bits are cut out you now need to take the original wrappers of the chocolate bars off carefully, insert the golden ticket and attach the new wrapper with some of the double sided tape. Remember to try and keep track of who the golden ticket is addressed to so that you can hand out or post the correct invites to the correct people.

Step Four

Hand out or post your invitations to your lucky guests! I posted most of my invites so that people got a surprise through the post as well as that special Golden Ticket Winner feeling. I even created the above stamp and printed them out onto standard sticky labels to add to the front of the parcels.